Summary
This solution represents a Children’s Smart Home Panel example that demonstrates how a smart home interface can be designed and implemented using Scene Composer. The goal of this solution is to present a simple, interactive, and visually engaging smart home environment that is easy to understand and appealing for children. The solution consists of multiple scenes that simulate common smart home functionalities. These scenes include the Home Screen, Light Control, Window Blind Control, Alarm Clock, Music Player, and a Night Light. Each scene represents a specific smart home feature and allows the user to interact with different UI elements such as buttons, sliders, and animations to control various functions.
The Home Screen acts as the central navigation hub, allowing users to switch between different smart home controls. For example, users can adjust lighting levels, control window blinds, enable or disable alarms, or manage music playback. These interactions are implemented using behaviors, which define how UI elements respond to user input and trigger different actions. For interacting with Home Assistant MQTT was used as a mid-layer.
This documentation also provides a tutorial explaining how the Smart Home solution is implemented, including scene creation, UI element configuration, behavior setup, and scene transitions. Additionally, the solution demonstrates the use of Culture settings, enabling support for multiple languages by allowing users to switch the display language dynamically.
Part 1: Solution Setup
Children Smart Home Part 1: Solution Setup
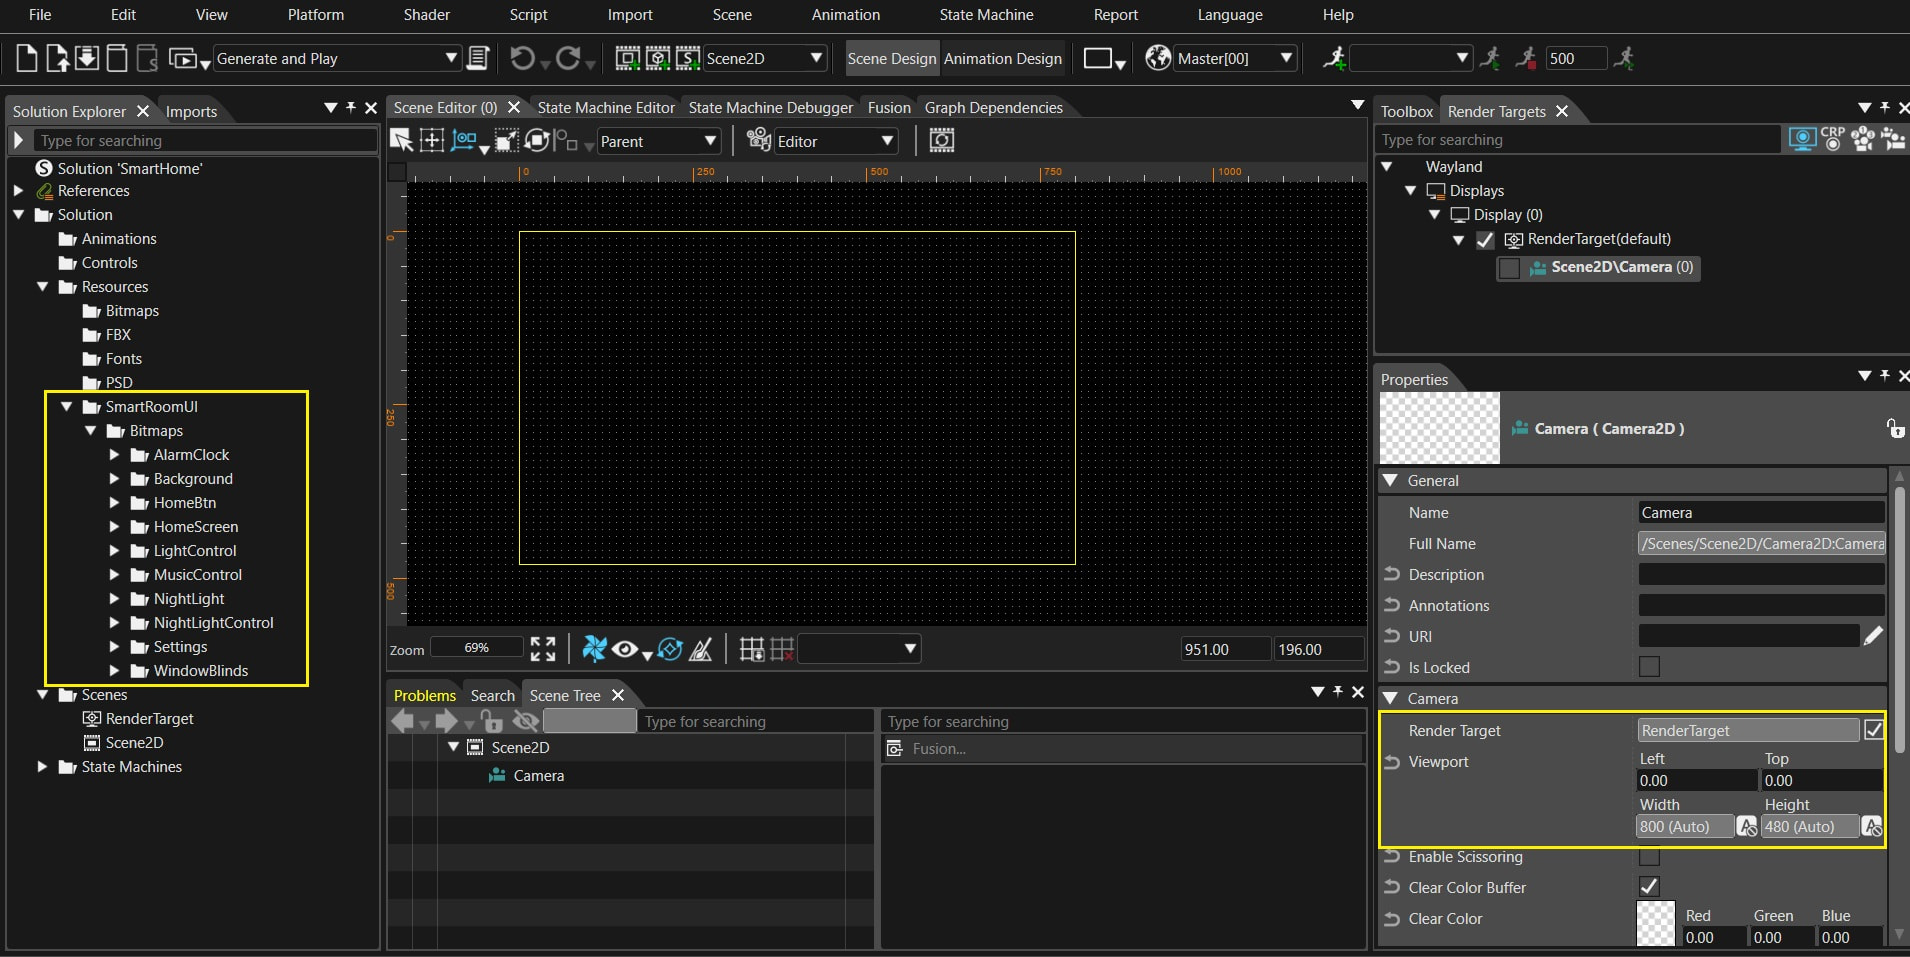
To provide you with a good basis to re-create the solution on your own, we provide an empty solution. Based on this you can create the solution by following the step-by-step guide below. This empty solution includes all bitmap images used in the final solution as well.
In particular, the empty solution includes:
- Basic solution setup with 800 × 480 resolution
- All bitmap images used in the final solution
- All used text styles
- Organized resource structure
- Ready-to-use bitmap resources
You can find all pre-imported bitmap images under Resources → Bitmap in the Solution Explorer. These resources can be used while creating scenes, controls, animations, and application functionality.
Part 2: Home Screen
Children Smart Home Part 2: Home Screen
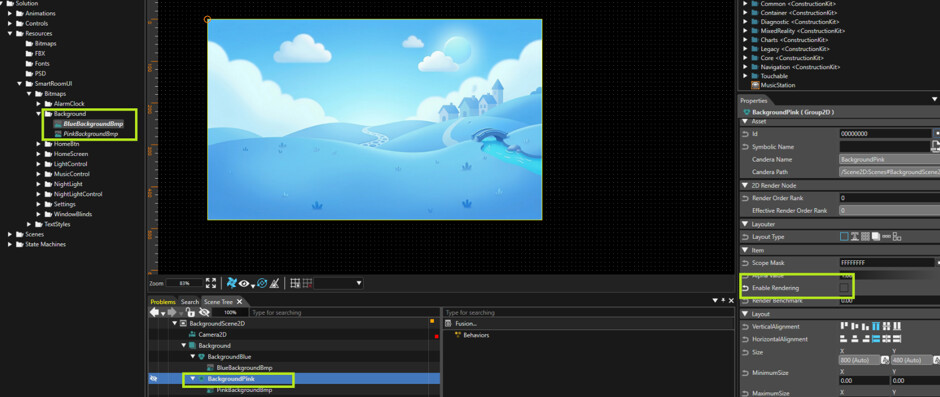
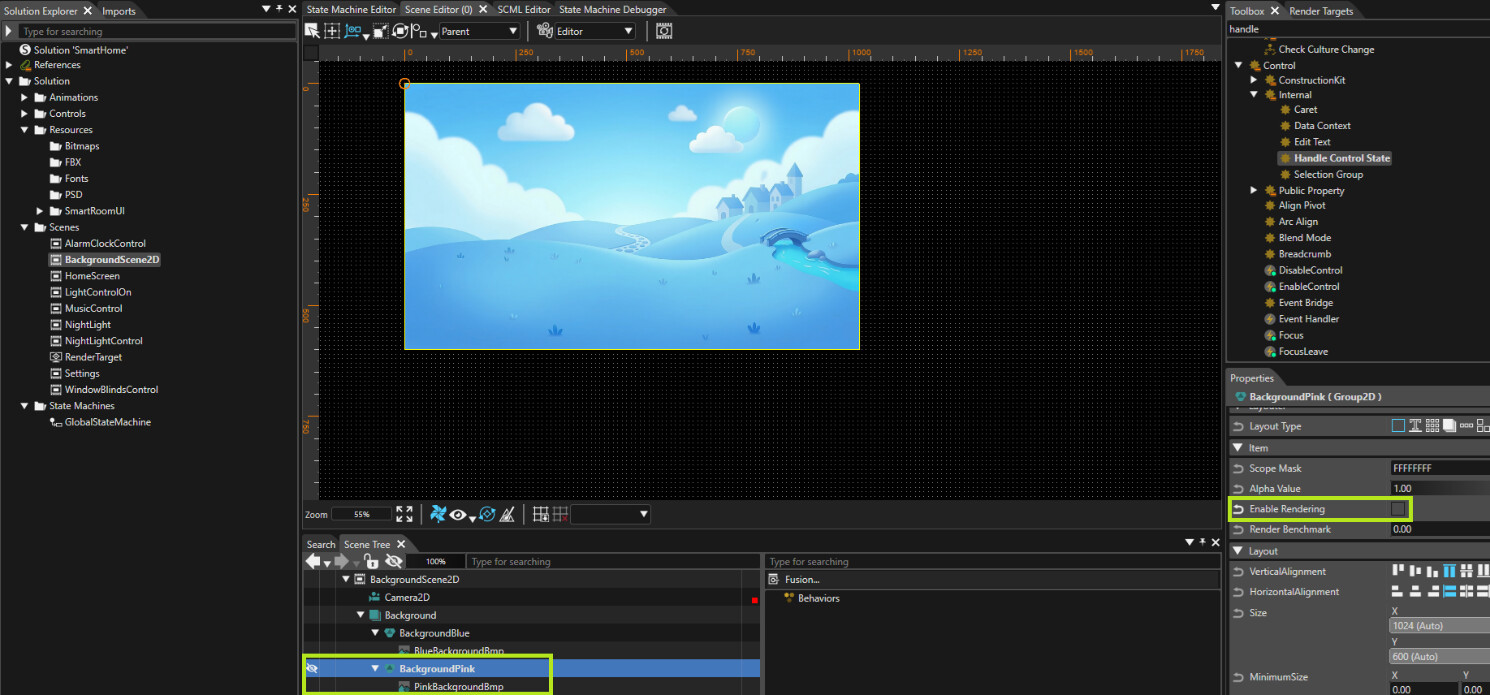
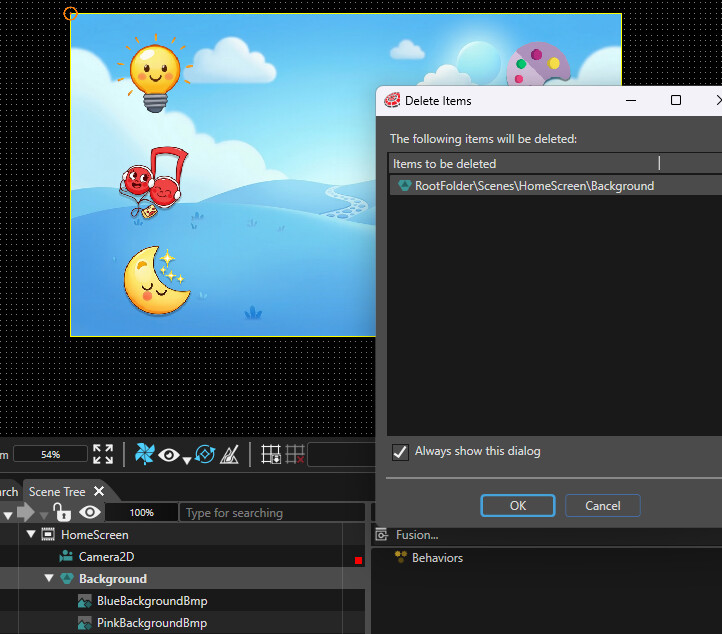
- Create a scene named as BackgroundScene2D
- Create 2 group named as BackgroundBlue and BackgroundPink
- Add BlueBackgroundBmp to BackgroundBlue from resources.
- Add PinkBackgroundBmp to BackgroundPink from resources.
- Disable the Enable Rendering (Ctrl + E) for the BackgroundPink group
- In this BackgroundScene2D Click on Camera2D
- Clear Color Buffer = True
- Enable Swapping = False
- Let’s start with HomeScreen
- Click on Camera2D → Clear Color Buffer = False
- Enable Swapping = True
- Now let’s create Buttons:-
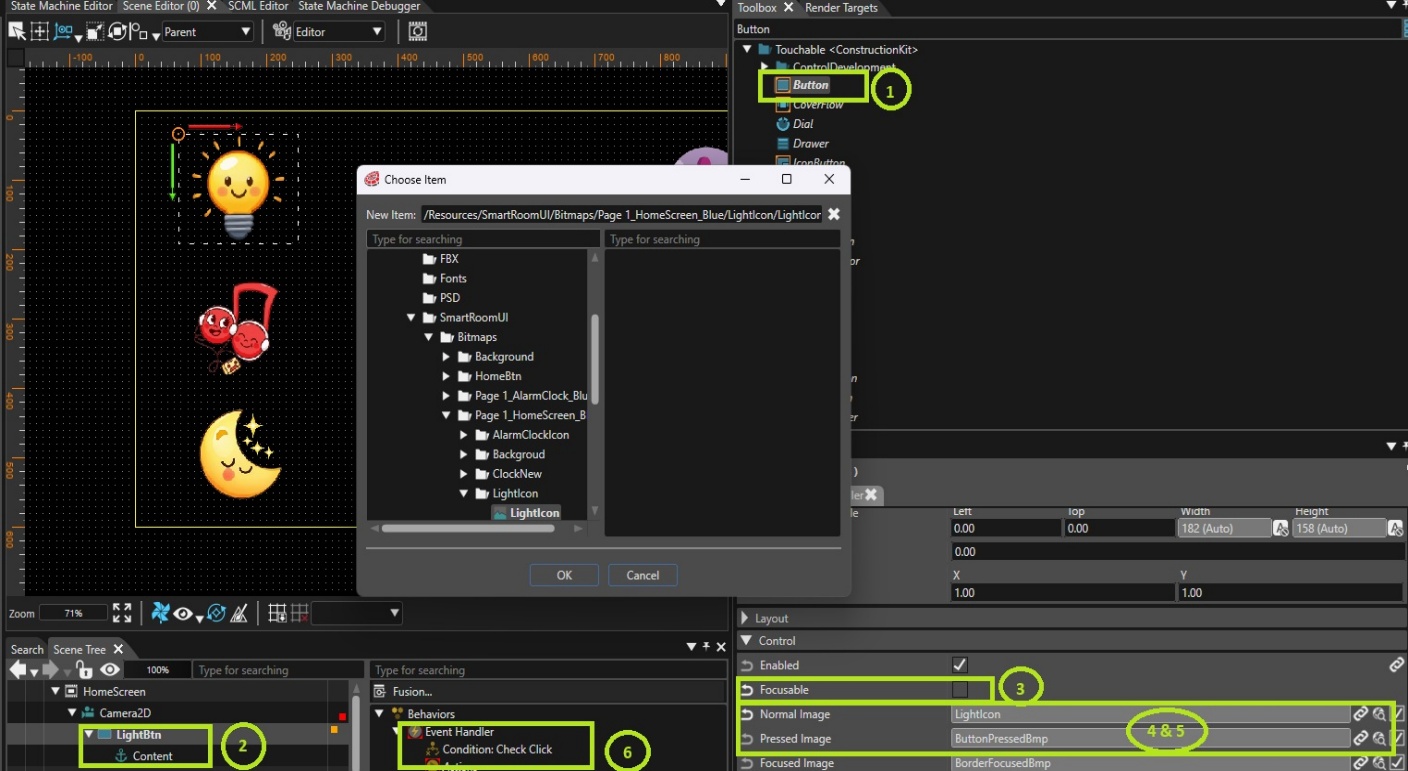
- Drag and drop a Button from the Toolbox.
- Click on the Button in the Scene Tree.
- In Properties, disable the Focusable option.
- For the Normal Image, select the LightIcon image from Resources.
- Similarly, select the LightIconPressed image for the Pressed Image.
- Delete the Event Handler from Behaviors.
- Repeat the same process for the other buttons, except the Theme button.
- The Theme button can be used to switch between the two background
images with the help of the common BackgroundScene2D.- Drag and drop two buttons and group them together. Name the group “ThemeBtn”.
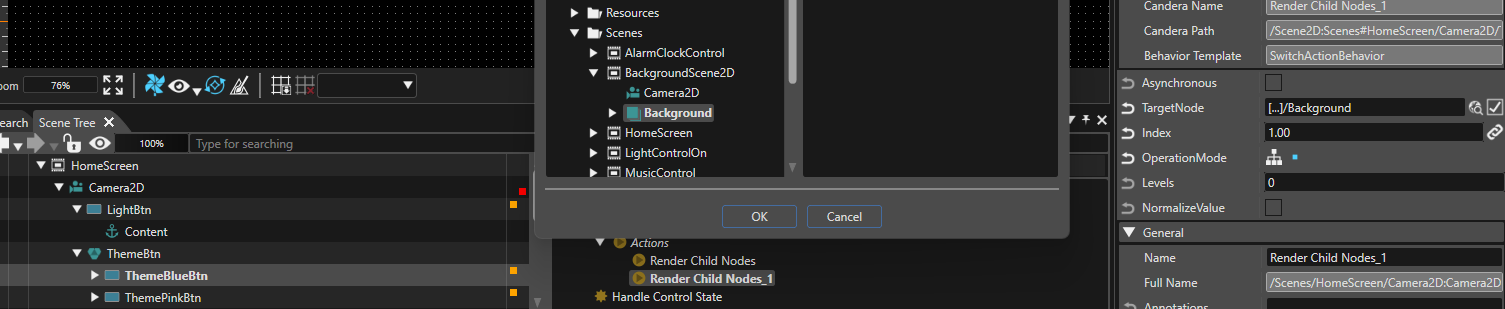
- For the ThemeBlueBtn, drag and drop two Render Child Nodes into the Actions.
- For the first Render Child Node, set the following properties:
- TargetNode = Group node (ThemeBtn)
- Index value = 2
- OperationMode = SingleNode
- For the second Render Child Node, set the following properties:
- TargetNode = Background group node from BackgroundScene2D
- Index value = 1
- OperationMode = SingleNode
- Similarly for the ThemePinkBtn drag and drop the 2 Render Child Nodes and swap the Index values
- For the first Render Child Node Index value = 1
- For the second Render Child Node Index value = 2
- Now Align all the Controls on the screen accordingly
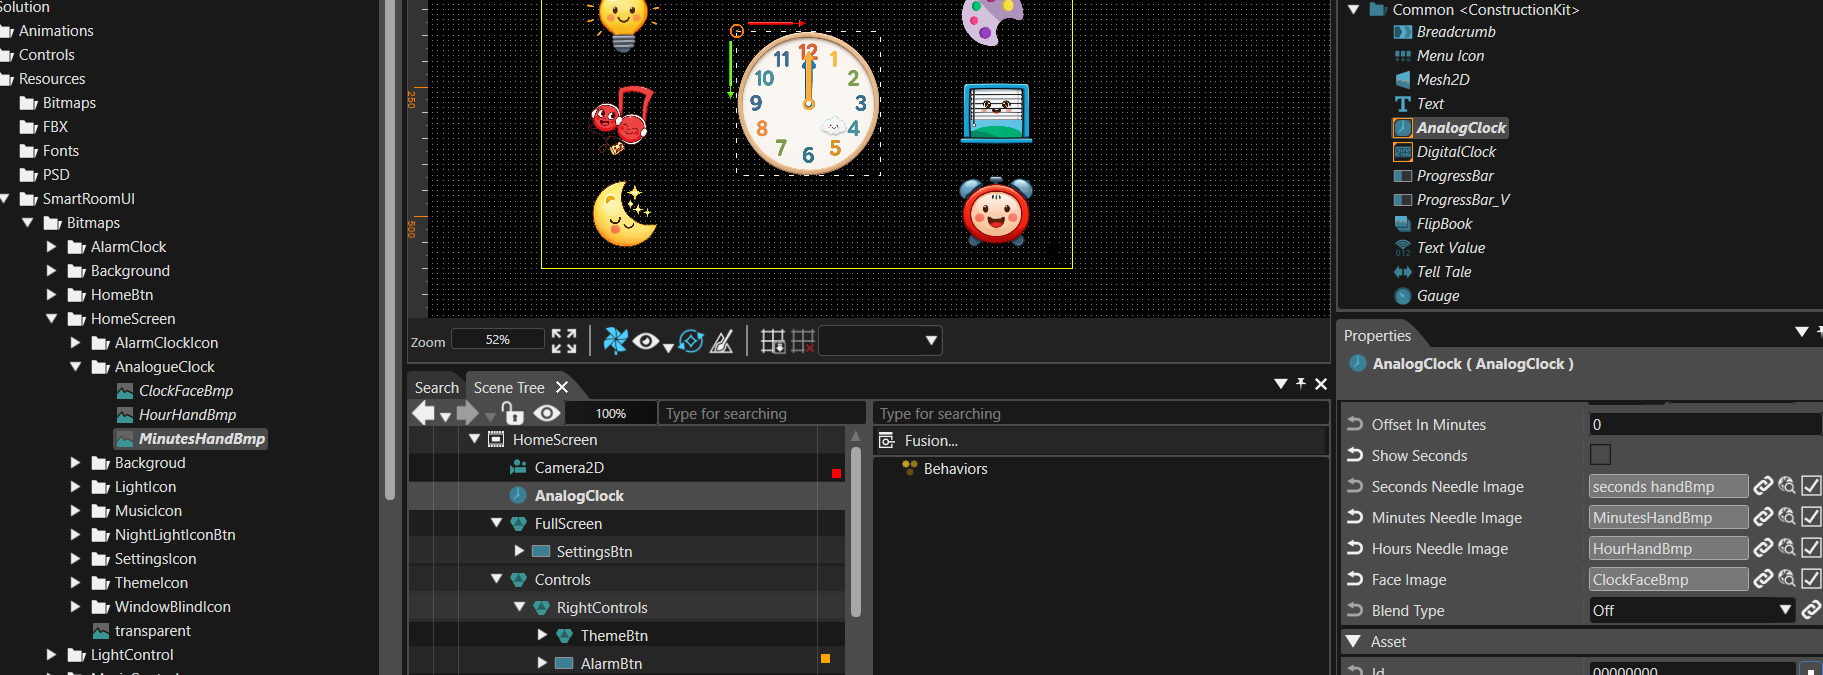
- Let’s drag and drop the AnalogClock from the Toolbox.
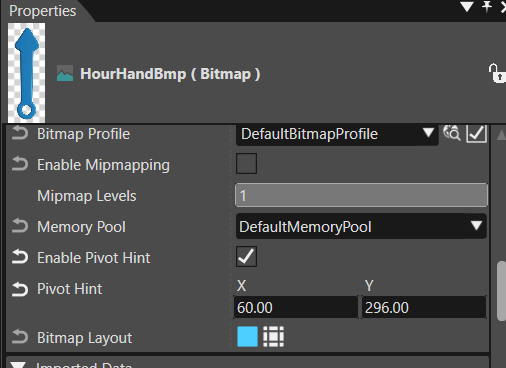
- Click on ClockFaceBmp in the Resources and enable the Pivot Hint option.
- Adjust the pivot hint X = 125 and Y = 125
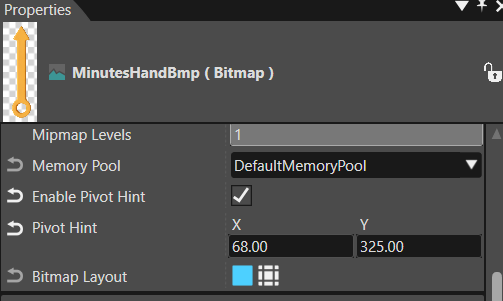
- Similarly, adjust the pivot point for HourHandBmp and MinutesHandBmp.
- HourHandBmp pivot hint X = 15 and Y = 78
- MinutesHandBmp pivot hint X = 19 and Y = 91
- Now click on the AnalogClock in the SceneTree
- Disable the Show Seconds option.
- Add the Face, Hour Needle, Minutes Needle images from resources
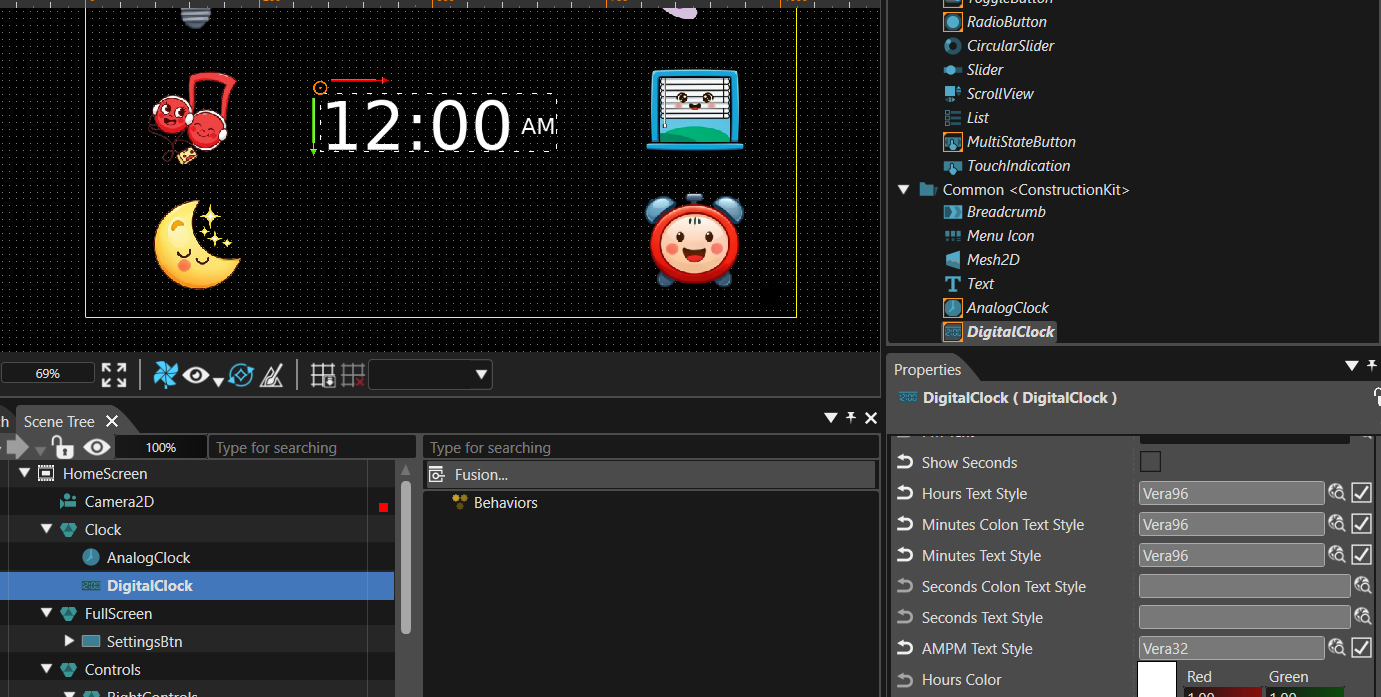
- Add a DigitalClock. Change the text style of Hours and Minutes to Vera96, and the AM/PM text style to Vera32. Also, set the text color to black.
- For the “Clocks” group node add Value behavior
- Minimum = 1
- Maximum = 2
- IntervalHandling = Cycle
- Add a Render Child Nodes behavior to the Receivers of Value and set the Operation Mode to Single.
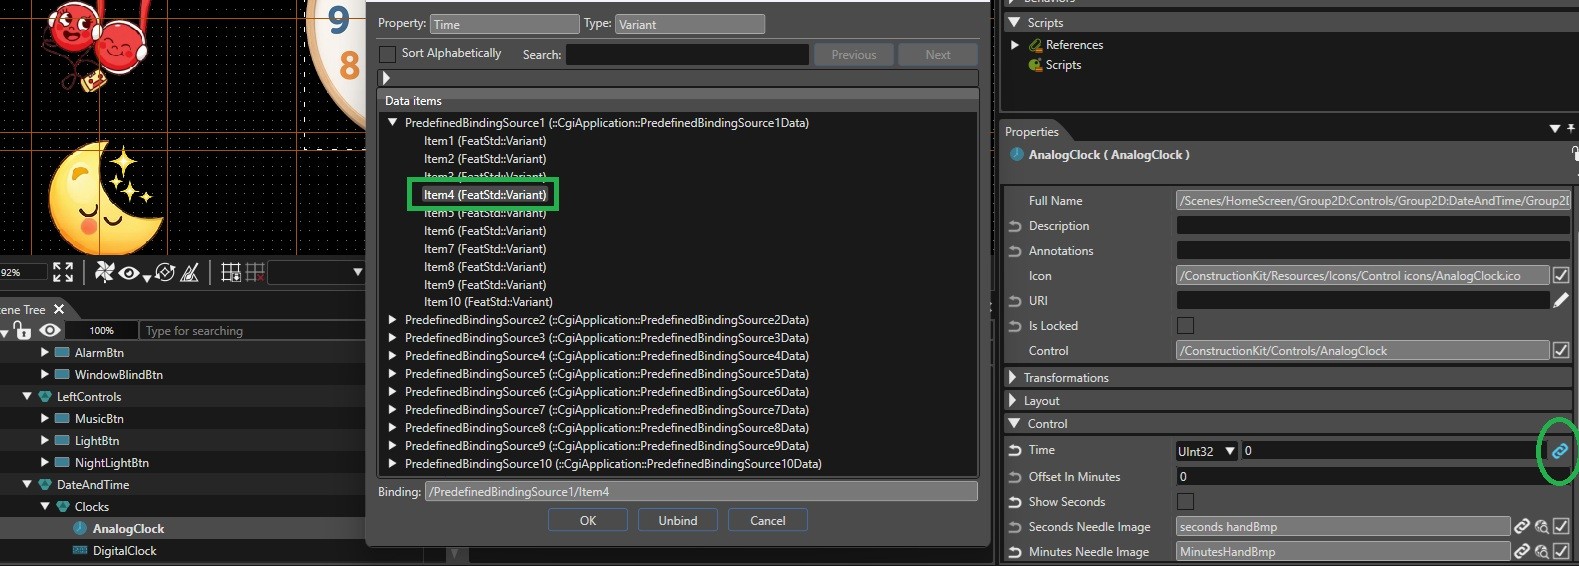
- Click on AnalogClock → Chain Icon (DataBinding) → Select Item 4
- For LightBtn, MusicBtn, NightLightBtn, WindowBlindBtn and AlarmClockBtn Add value behavior
- Minimum = 0
- Maximum = 1
- IntervalHandling = Cycle
- Add a Render Child Nodes behavior to the Receivers of Value and set the Operation Mode to Single.
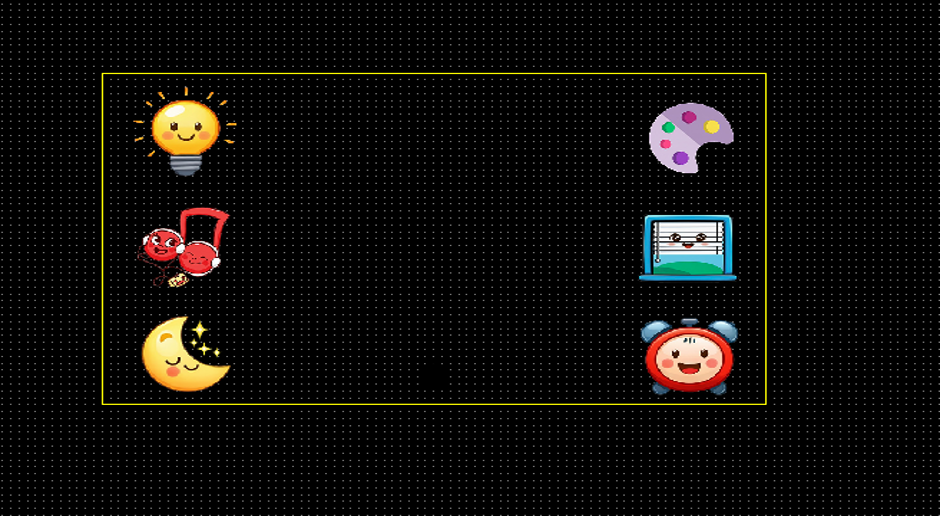
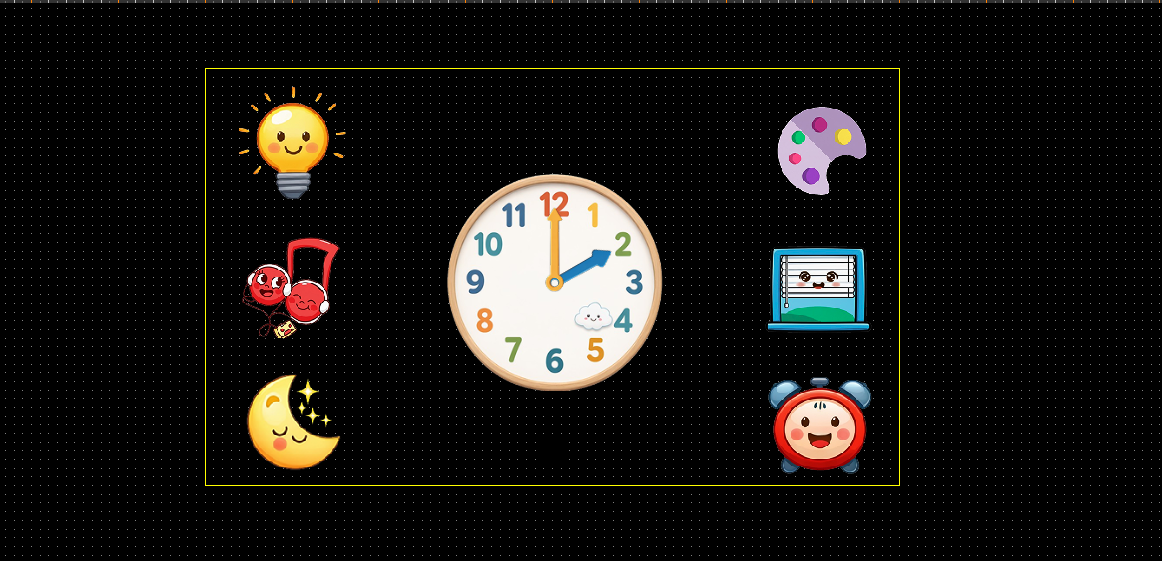
- This is the final outcome scene. You can refer to this image for better understanding and positioning of the nodes according to your scene dimensions.





Part 3: Light Control
Children Smart Home Part 3: Light Control
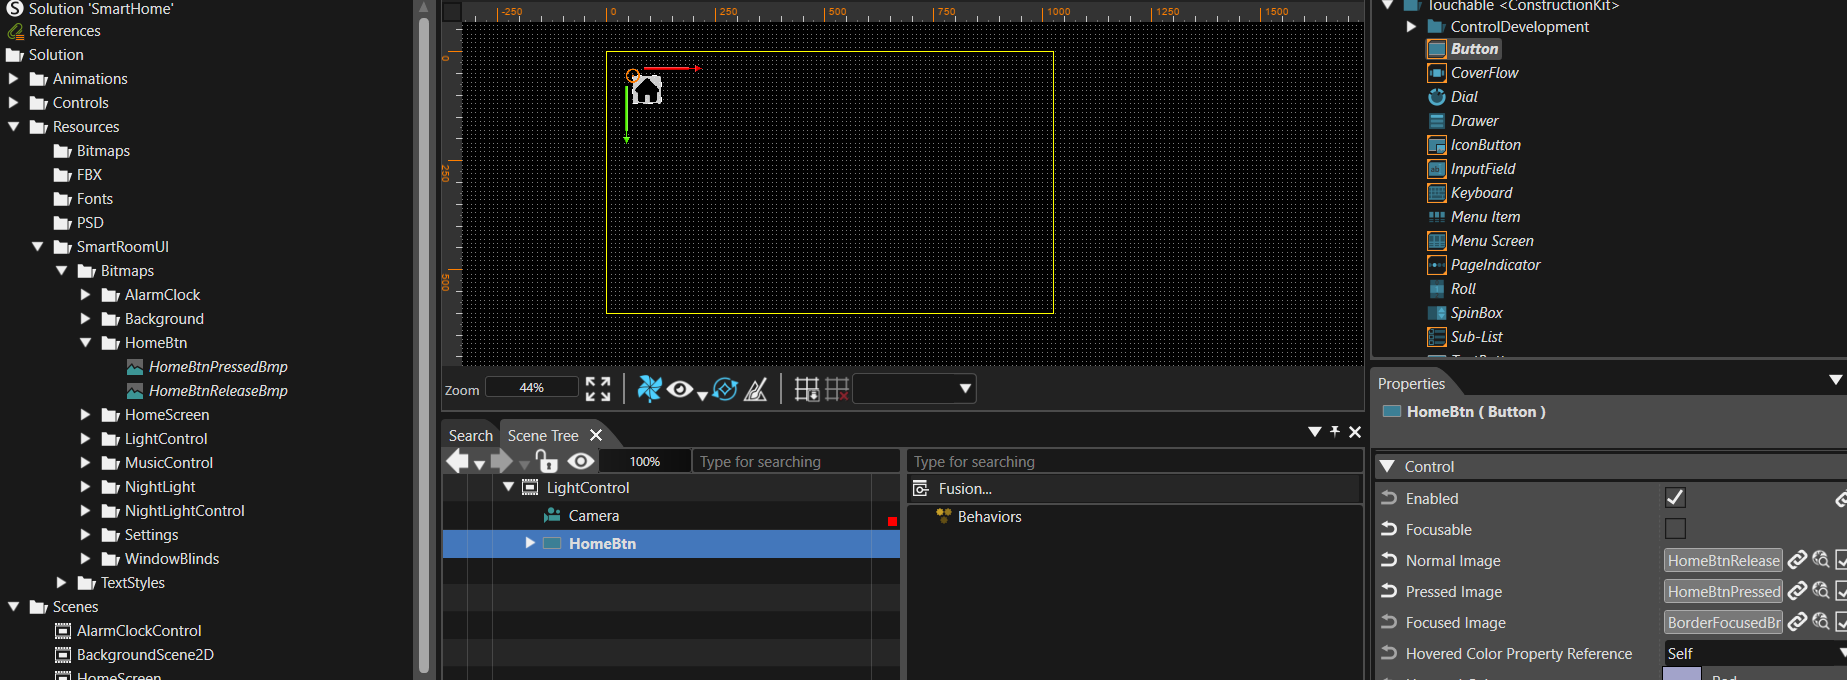
- Add a Button and set its images from the Resources to create a HomeBtn
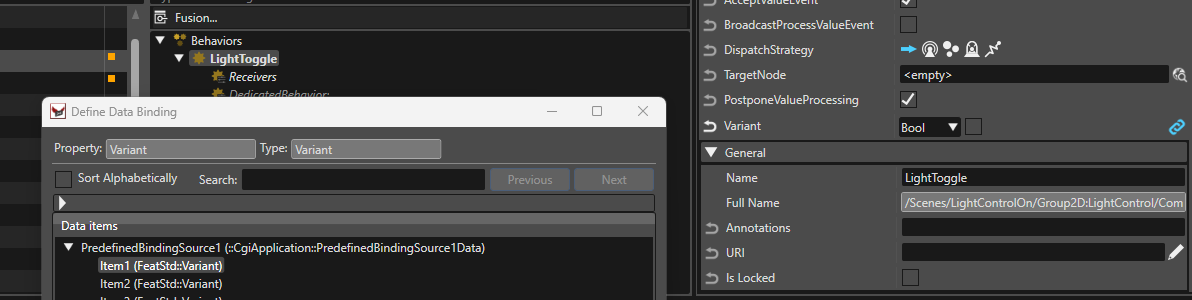
- In the Behaviors of this button, add a Value behavior and name it LightToggle.
- Variant = Bool
- Click the chain icon for data binding and select Item 1 from PredefinedBindingSource1.
- LightOn and LightOff Group
- Select the LightOn and LightOff groups, and group them together as LightState.
- Add two buttons and keep them in LightOn and LightOff Group name them as LightOnOffBtn
- LightOnOffBtn in LightOn and LightOff group
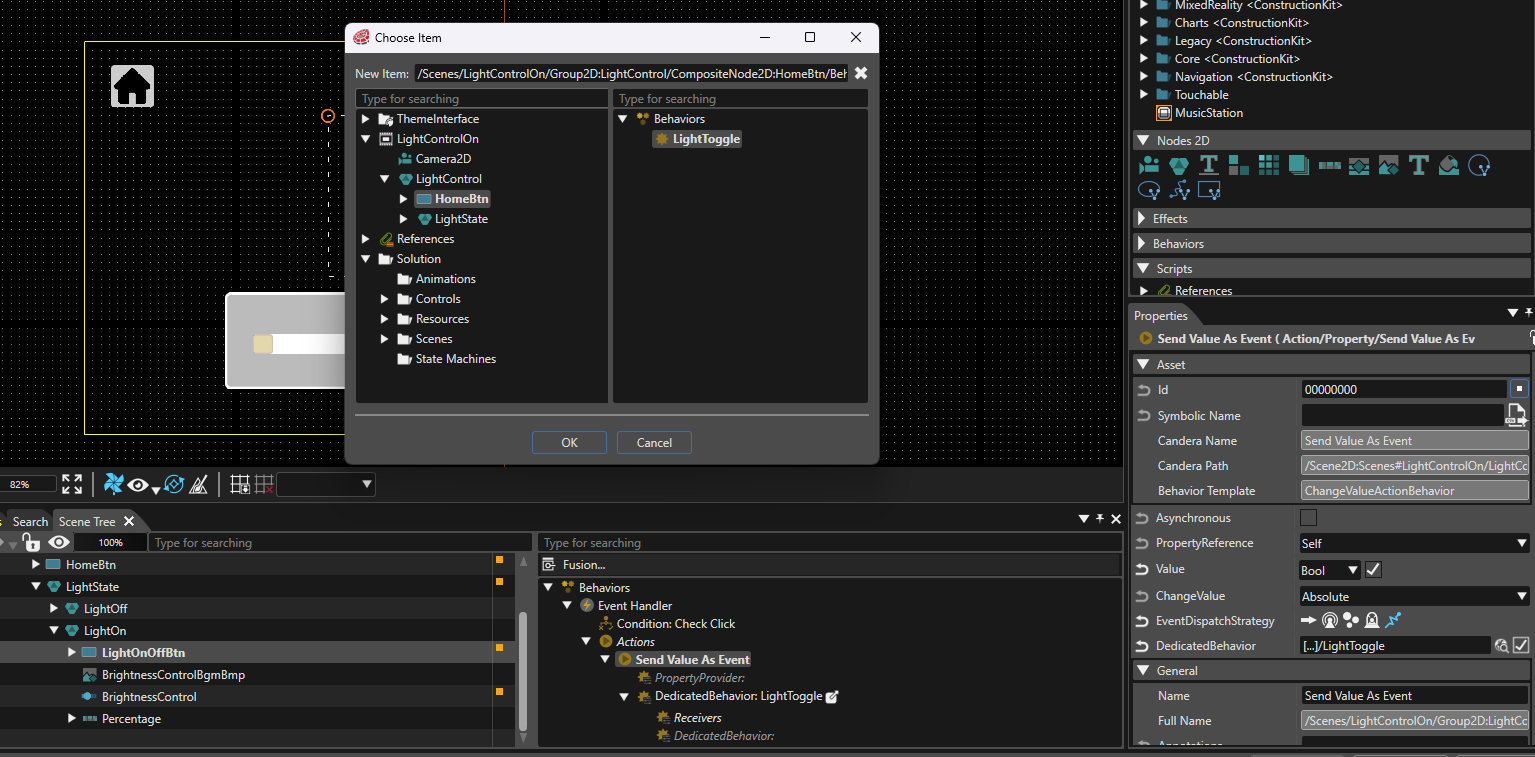
- Add Event Handler in behaviors
- Condition = Check click
- Action = Send Value As Event
- Value = Bool (Enabled)
- EventDispatchStrategy = DedicatedBehavior
- DedicatedBehavior = Path to LightToggle value behavior
- LightOnOffBtn in LightOn and LightOff group
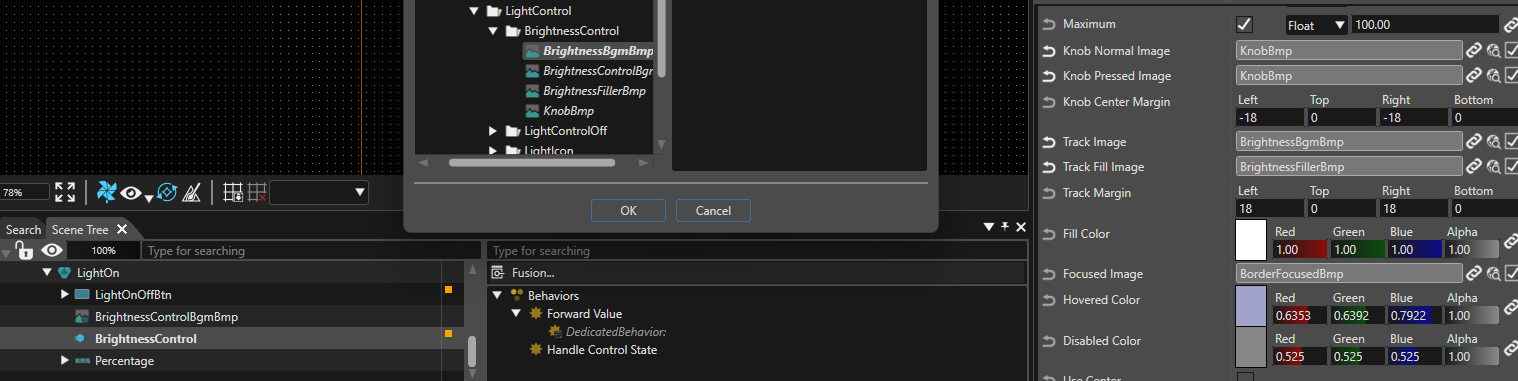
- Drag the BrightnessControlBgmBmp image from Resources and place it in the LightOn group.
- Add a Slider to the LightOn group and set the Knob, Track, and Track Fill images from the Resources.
- Disable the Focusable option.
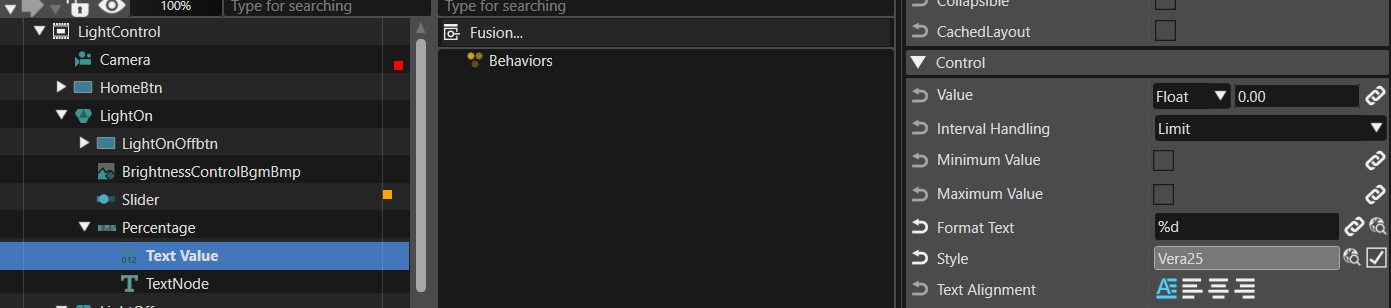
- Add TextValue and TextNode from the Toolbox and group them together.
- Rename the group to Percentage and set it to a Horizontal Stack Layout.
- Change the Format Text property of TextValue to “%d”.
- Change the text of TextNode to “%”
- Rename TextValue to BrightnessPercentage and TextNode to PercentageIcon.
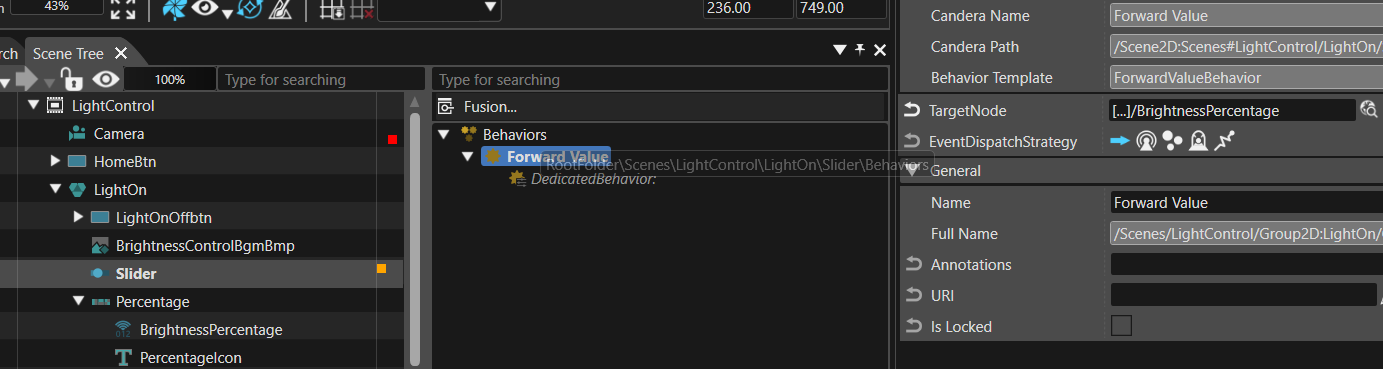
- Add a Forward Value behavior to the Slider.
- Set the Target Node path toBrightnessPercentage.
- Add BrightnessControlBgmBmp, BrightnessBgmBmp, and KnobBmp from the
LightControlOff resource folder to the LightOff group in the Scene Tree. - Add a Value behavior to the LightState group.
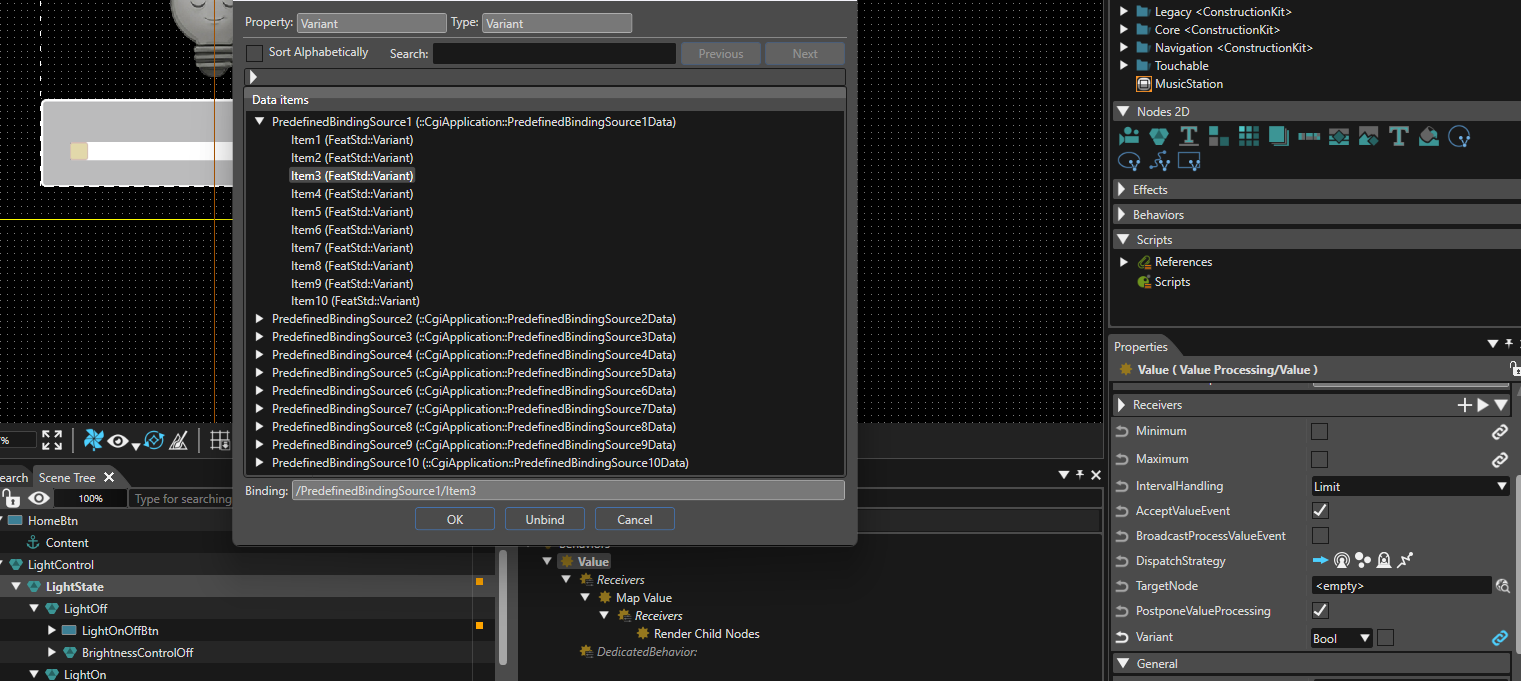
- Variant = Bool
- Click the chain icon and select Item 3 from PredefinedBindingSource1.
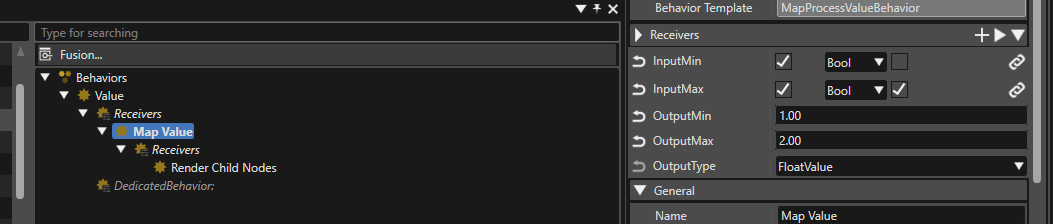
- Add a Map Value behavior to the Receivers of the Value behavior.
- Enable InputMin and InputMax set it to Bool
- InputMin = False
- InputMax = True
- OutputMin = 1.00
- OutputMax = 2.00
- Add Render Child Nodes behavior to the receivers of Map Value
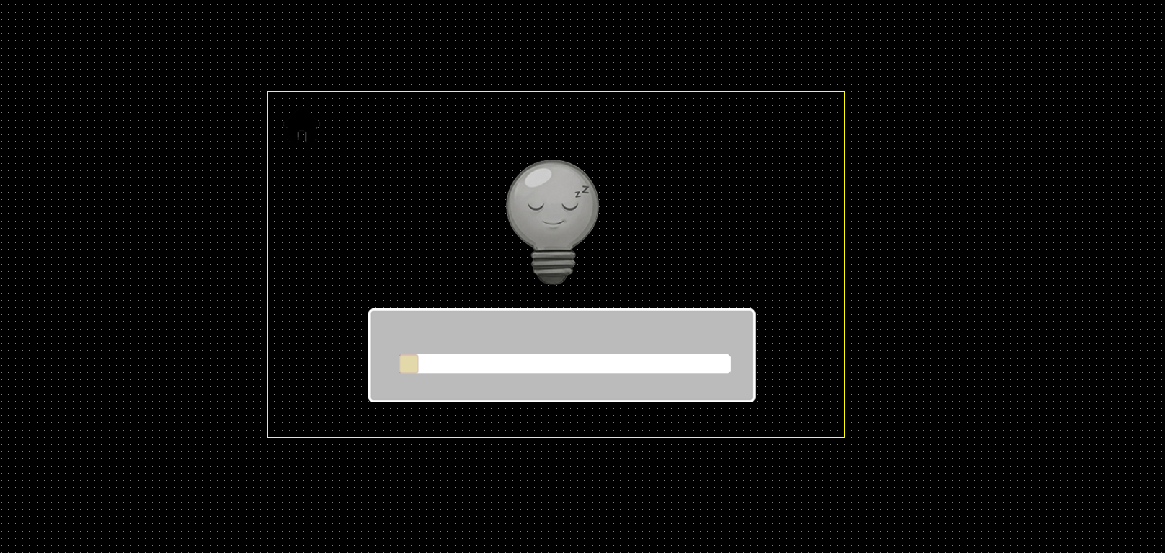
- Referencing this final scene may help in aligning and positioning the nodes more accurately.

Part 4: Night Light Control
Children Smart Home Part 4: Night Light Control
- Use the NightLightBackgroundBmp Image from resources as background
- Drag and Drop the Slider from ToolBox.
- Value = 1
- Focusable = Disable
- Minimum = 1
- Maximum = 100
- Set the Knob, Track, and Track Fill images from the Resources.
- Use BrightnessControlBgmBmp from Resources as the background for the Slider and group them together.
- Add TextValue and TextNode, group them together, and set the layout to Horizontal Stack.
- Add a Forward Value behavior to the Slider and set the Target Node path to TextValue.
- BrightnessControlBgmBmp add this Image from resources as background of slider
- Add another button (BackBtn) and set its bitmaps from the Resources.
- Group all slider controls and BackBtn into SliderAndBackBtn.
- Add an Enable Rendering action to BackBtn and set the Target Node path to the group.
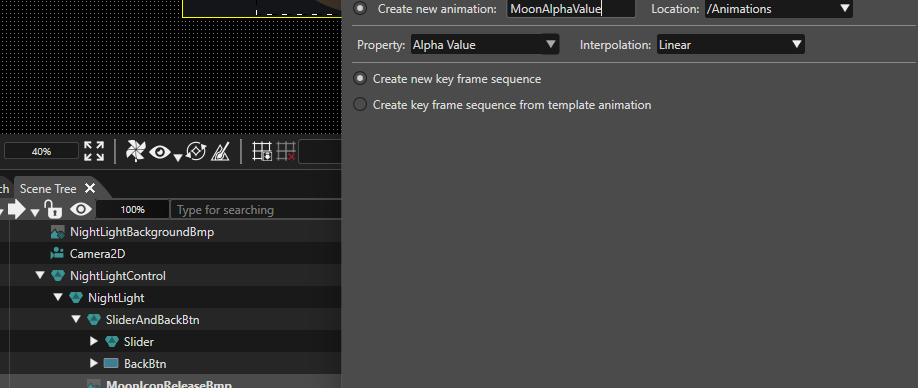
- Now Add the MoonIconBmp from Resource
- Right-click → Add Animated Property
- Create new animation = MoonAlphaValue
- Property = AlphaValue
- Interpolation = Linear
- Click Ok
- Insert keyframes and increase the alpha value in each frame.
- Add an Event Handler to MoonIconBmp,
- Add Check Click to the condition from ToolBox
- Add an Enable Rendering action. Set the Target Node path to SliderAndBackBtn and make it visible.
- Now, return to the Slider to update the alpha value when it is moved.
- Add a Process Value Changed Event
- Minimum = 0
- Maximum = 100
- Add a Map Value behavior to the Receivers
- InputMin = 0
- Inputmax = 100
- OutputMin = 0
- OutputMax = 1
- Add Jump To Animation Keyframe to the Receivers of Map Value
- Select the MoonAlphaValue Animation into the Animation property
- Select the MoonAlphaValue Animation into the Animation property
- Add a Process Value Changed Event
- Disable the SliderAndBackBtn group






Part 5: Window Blinds Control
Children Smart Home Part 5: Window Blinds Control
- Add two buttons to open and close the window blind, and set their bitmaps from the Resources.
- Add a Text Node inside each button and set the text to “Open” and “Close” respectively.
- Create a group of WindowBlindLayersBmp, WindowBmp, WindowBlindStickBmp, WindowBlindRollerBmp
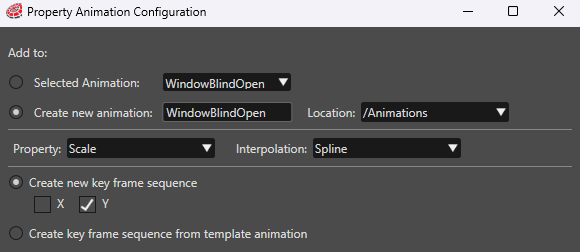
- Right click on WindowBlindLayersBmp → Add Animated Property
- Create a new animation named WindowBlindOpen.
- Set the interpolation to Spline.
- Select only the Y keyframe sequence.
- Click Ok
- Add four keyframes with Y values: 1.00, 0.66, 0.33,0.00.
- Similarly, create a WindowBlindClose animation and set the Y values to 0.00, 0.33, 0.66, and 1.00.
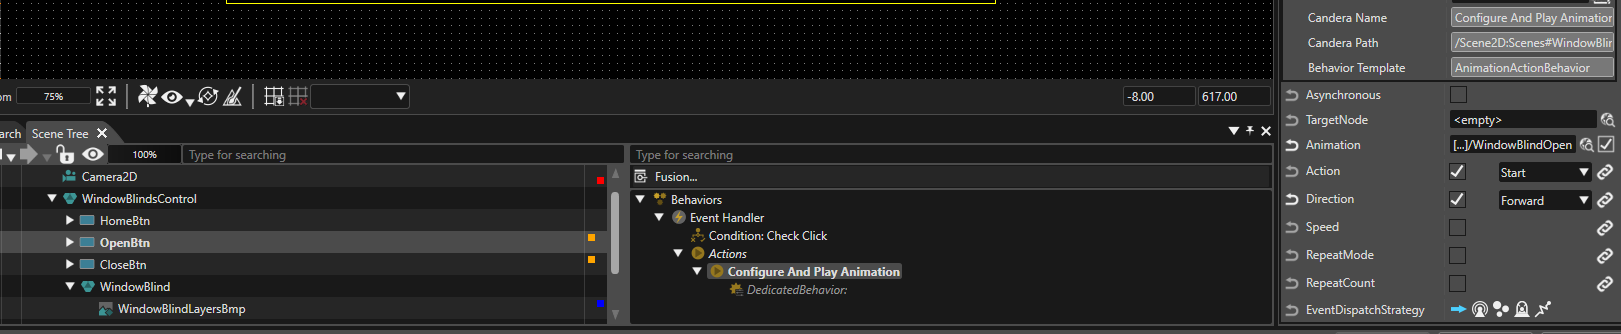
- Select the OpenBtn, add an Event Handler with the Check Click condition, then add Configure and Play Animation actions.
- Animation = WindowBlindOpen
- Action = Start
- Direction = Forward
- Follow the same steps for CloseBtn.



Part 6: Settings
Children Smart Home Part 6: Settings
- Create a separate group for each item in the settings list. For example:
- Group StandardClockBgm, Standard Clock, and Arrow together and name it StandardClock.
- Add two more Text Nodes to this group and name them Analogue and Digital. Group them together inside StandardClock and name the group TextList.
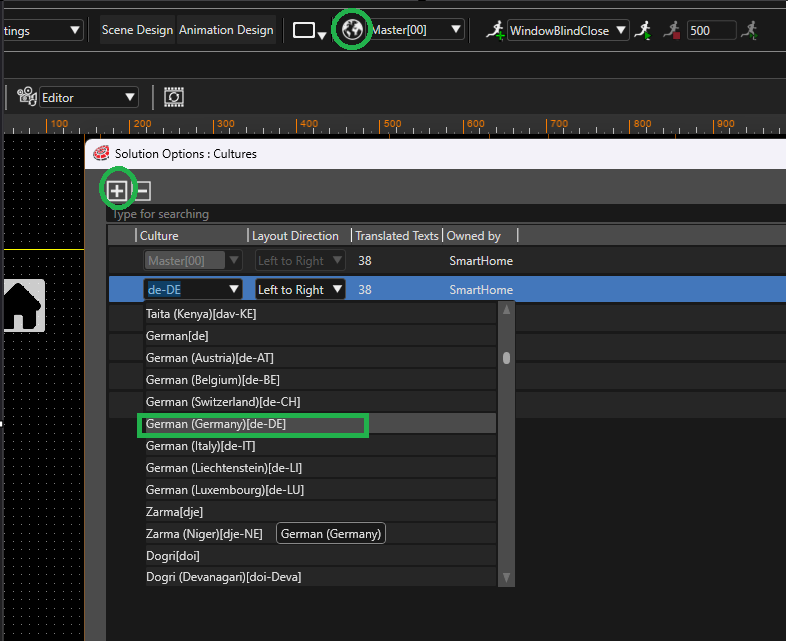
- Click the globe icon at the top.
- Click the “+” icon.
- Add your preferred language (German is used here as an example).
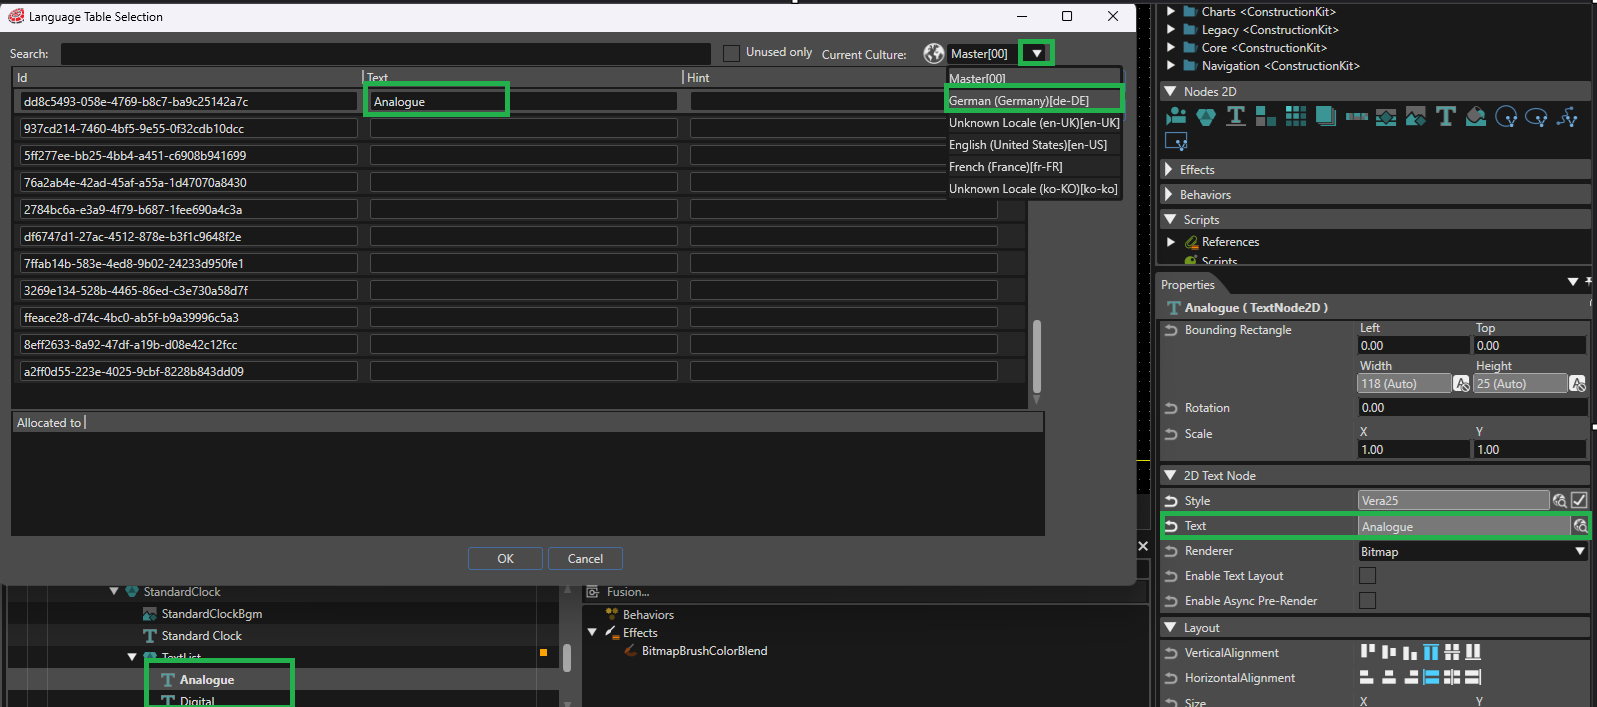
- Select the Analogue text.
- Click the magnifying glass icon next to the Text property.
- Add “Analogue” for English.
- Click the dropdown next to Master [00] (top right) and select German.
- Translate “Analogue” to German (“Analog”) and add it under the same Text ID.

- Repeat the same steps for Digital
- Select the TextList group node.
- Add a Value behavior and, in Receivers, add Render Child Nodes.
- To the Value behavior
- Minimum = 0
- Maximum = 2
- IntervalHandling = Cycle
- Variant = 1
- Set the Operation Mode of Render Child Nodes to SingleNode.
- Now click on the Arrow image
- Add Event Handler and a Check click to condition
- Add 2 Send value as event in actions
- For the first, send the value as an event.
- TargetNode = TextList
- Value = 1.00
- ChangeValue = Relative
- For the second, send the value as an event.
- TargetNode = Clocks group node from HomeScreen
- Value = 1.00
- ChangeValue = Relative
- Repeat the same steps for Light, Music, Window Blinds, Alarm Clock,
Night Light and Language. - Change the Target Node for the “Send Value as Event” accordingly.
- Add on’s for language
- Leave the Target Node empty for the second “Send Value as Event.”
- Include a Handle Control State.
- Configure a Value behavior:
- Minimum = 1.00
- Maximum = 2.00
- IntervalHandling = Cycle
- In Receivers, include “Action on Value.”
- For the first Action on Value
- Set condition to “Check Processed Value”
- ConditionalOperator = Equal
- ConditionalValue = 1.00
- Use “Set Culture” in Actions (Locale = 00)
- For the second Action on Value
- Set condition to “Check Processed Value”
- ConditionalOperator = Equal
- ConditionalValue = 2.00
- Use “Set Culture” in Actions (Locale = de-DE)




Part 7: Music Control
Children Smart Home Part 7: Music Control
- For the Music Control scene, create a custom control for radio stations.
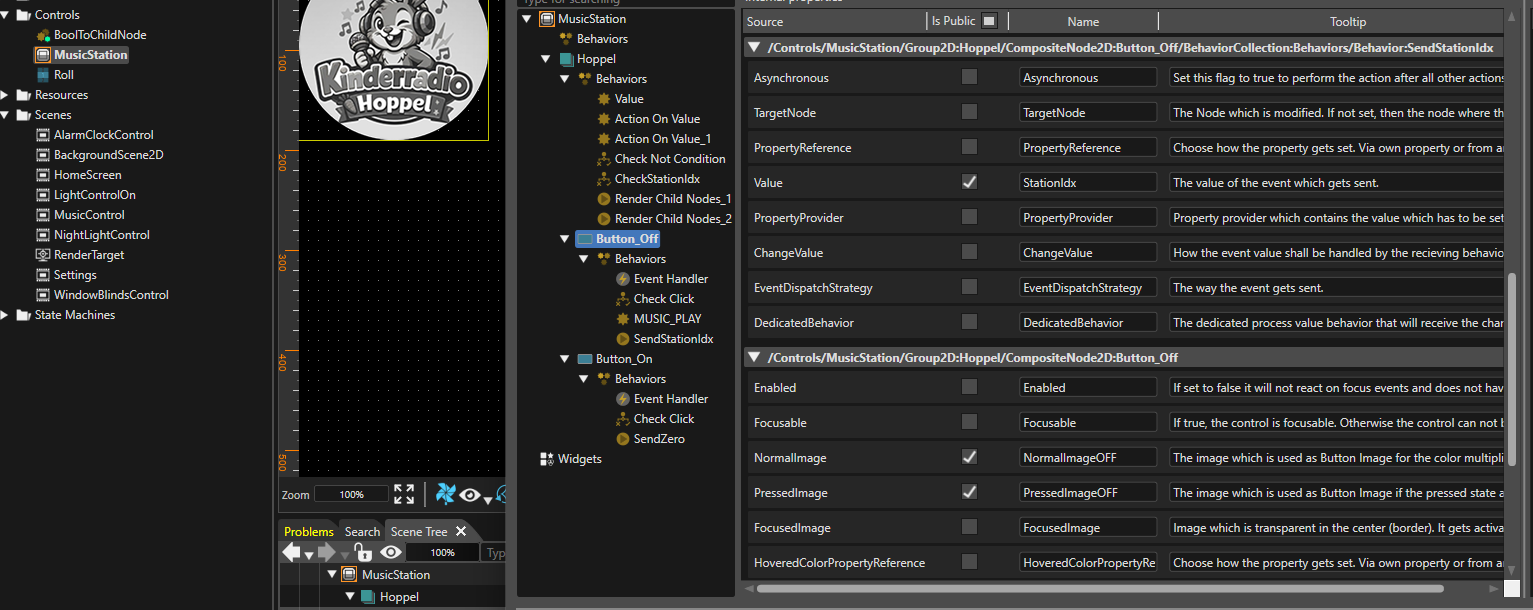
- Drag and drop two Buttons, name them Button_On and Button_Off, group them together, and set the group to an Overlay layout name it as Hoppel.
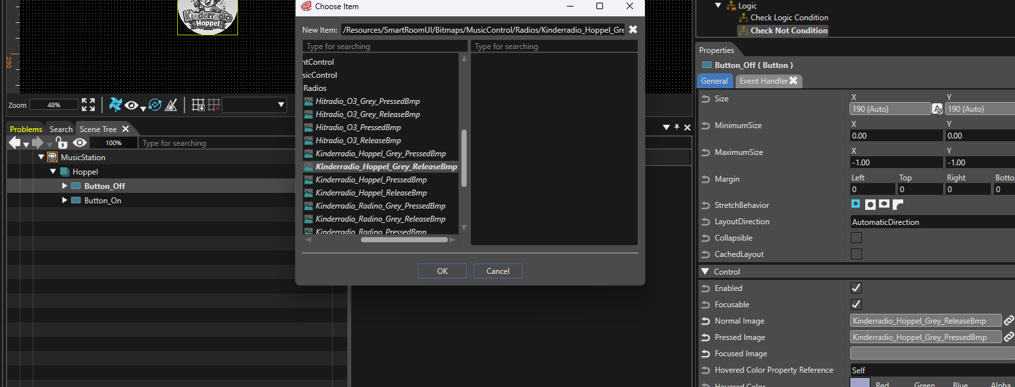
- For the Button_Off Normal Image is Kinderradio_Hoppel_Grey_ReleaseBmp
- And Pressed Image is Kinderradio_Hoppel_Grey_PressedBmp
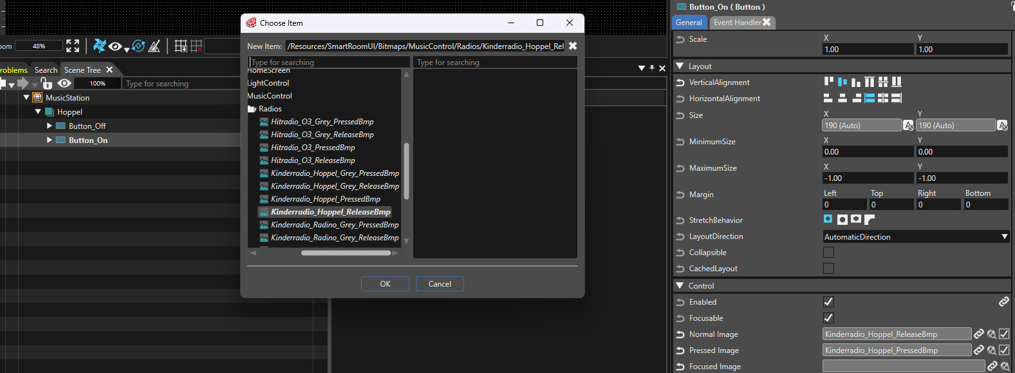
- For the Button_On Normal Image is Kinderradio_Hoppel_ReleaseBmp
- And Pressed Image is Kinderradio_Hoppel_PressedBmp
- On Button_Off, use “Send Value as Event” (SendStationIdx) in Actions.
- Value = 1 (UInt8)
- EventDispatchStrategy = DedicatedBehavior
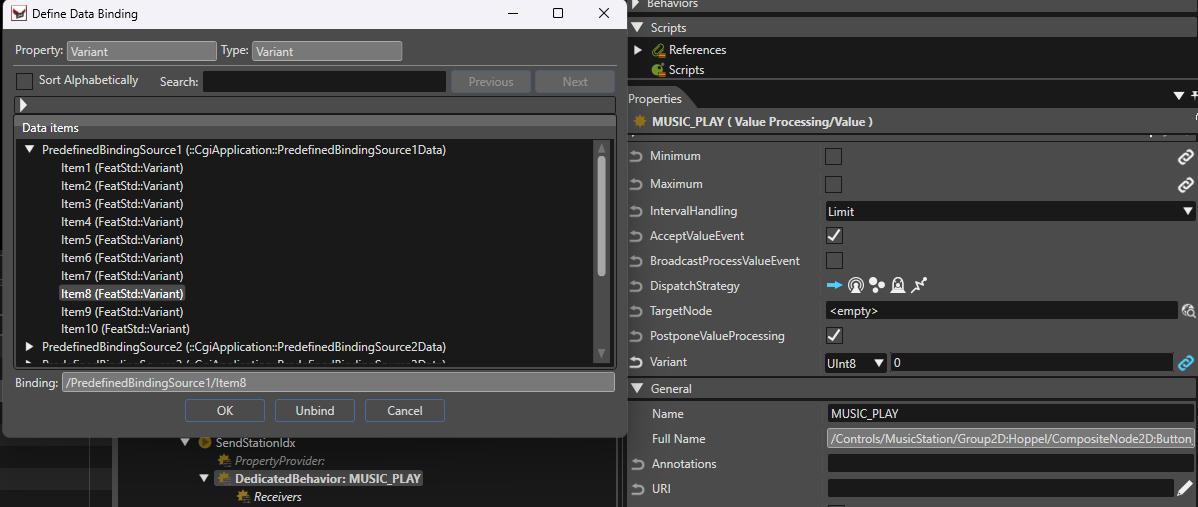
- Set the DedicatedBehavior to a Value behavior named MUSIC_PLAY.
- Set the variant to DataBinding PredefinedBindingSource1, Item8 (UInt8)
- On Button_On, use “Send Value as Event” (SendZero) in Actions.
- Value = 0 (UInt8)
- EventDispatchStrategy = DedicatedBehavior
- Use the same DedicatedBehavior (MUSIC_PLAY) as in Button_Off.
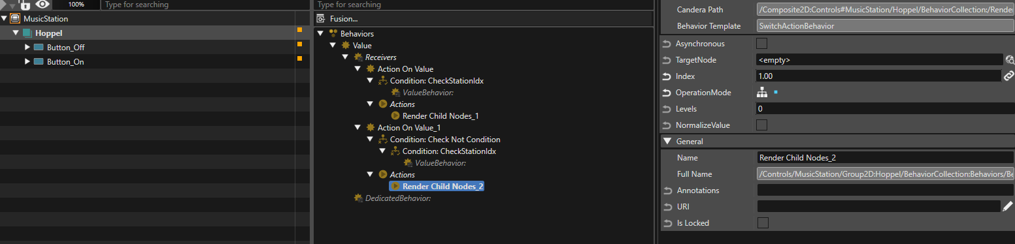
- On the Hoppel group
- Value behavior
- Add Action on Value to the Receivers
- Condition : Check Processed Value
- ConditionOperator = Equal
- ConditionValue = 1 (UInt8)
- Add Render Child Nodes to Actions
- Index = 2
- OperationMode = SingleNiode
- Add another Action on Value to the Receivers
- Condition : Check Not Condition
- Add another Check Processed Value name it as CheckStationIdx
- ConditionOperator = Equal
- ConditionValue = 1 (UInt8)
- Add Render Child Nodes to Actions
- Index = 1
- OperationMode = SingleNiode
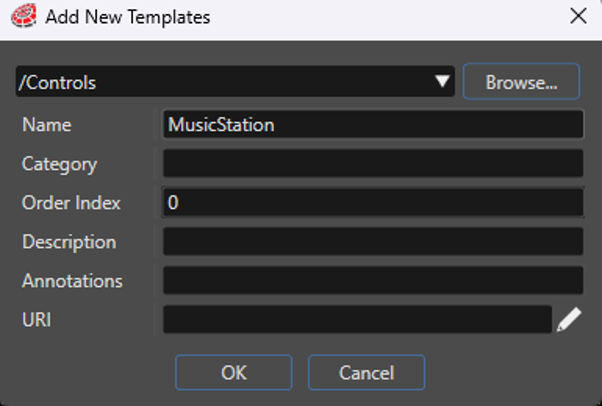
- Right-click on the group (Hoppel) → select “Save as Control,” name it MusicStation, and click OK.
- Now Right click on MusicStation control → ControlProperties
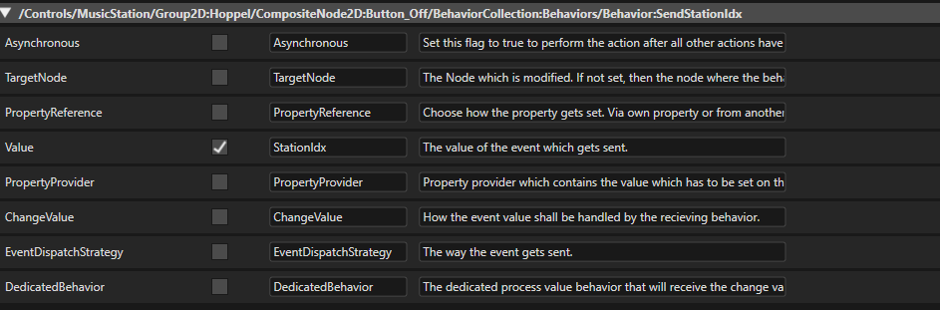
- For Button_Off, enable the “Is Public” option for Value, NormalImage, and PressedImage, and name them accordingly.
- For Button_On enable the “Is Public” option for NormalImage, and PressedImage, and name them.
- For CheckStationIdx Make the ConditionValue “Is Public” and name it as stationIdx_
- For SendStationIdx Make the Value “Is Public” and name it as stationIdx
- For Button_Off, enable the “Is Public” option for Value, NormalImage, and PressedImage, and name them accordingly.
- Drag and drop this control three times for different radio stations, and name them Hoppel, OE3, and Radino and change the Normal and Pressed Images
- For Hoppel Control Station Idx_ and Station Idx is 1 (UInt8)
- For Radino Control Station Idx_ and Station Idx is 2 (UInt8)
- For OE3 Control Station Idx_ and Station Idx is 3 (UInt8)
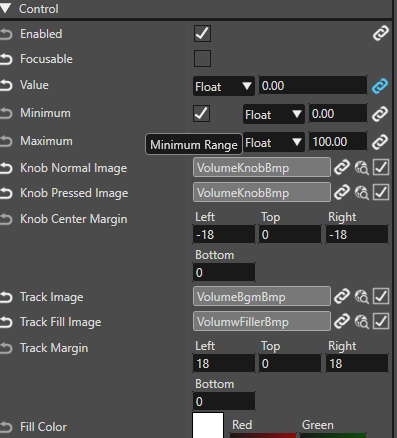
- Add a Slider from the Toolbox and set its images from the Resources.
- Focusable = Disable
- Value = 0 (Databinding to PredefinedBindingSource1 → Item9)
- Minimum = 0
- Maximum = 100
- Add SliderBgmBmp and SpeakerIconBmp along with the Slider, and group them as Controls.
- Note: To each slider add a Handle Control State.



Part 8: Alarm Clock Control
Children Smart Home Part 8: Alarm Clock Control
- Arrange the images from the Resources.
- Create two groups : AlarmEnable and TimeRoller.
- In the AlarmEnable group, include the background image, AlarmClock text node, AlarmClock icon, and a Toggle button from the Toolbox.
- In the TimeRoller group, include a BitmapNode, a TextNode for the colon.
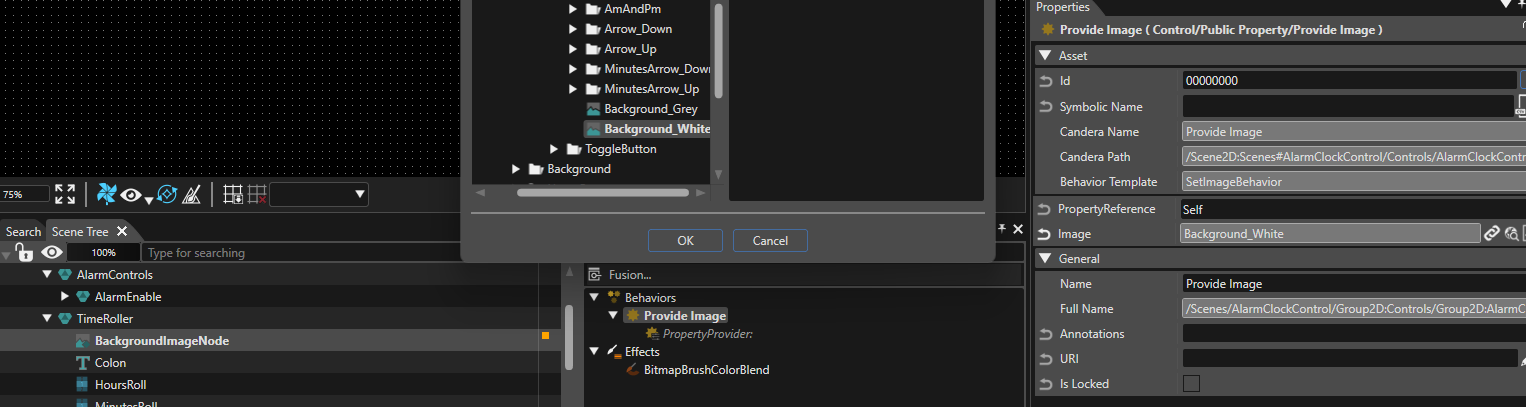
- For the BitmapNode (BackgroundImageNode), configure the Provide Image behavior and set the Image property to Background_White from the Resources.
- Add Roll from the Toolbox to the Controls folder in the Solution Explorer.
- Right-click on Roll → Control Properties → enable “Handler Control State.”
- Drag and drop two Roll controls into the Scene Tree under the TimeRoller group.
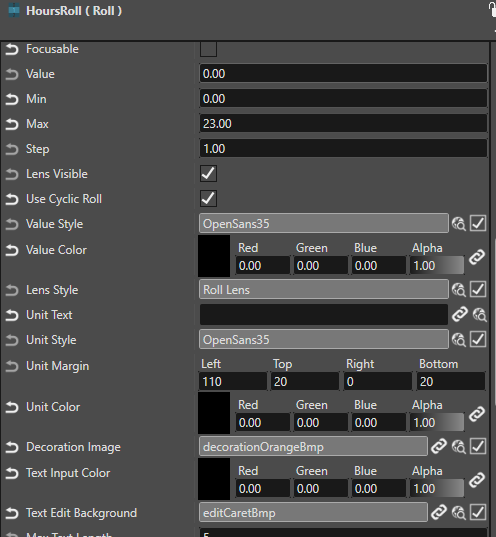
- For the HoursRoll
- Focusable = Disable
- Value = 0
- Min = 0
- Max = 23
- Use Cyclic Roll = Enable
- Value Color = Balck
- Unit Text = Add one space
- Unit Color = Black
- Decoration Image = decorationOrangeBmp
- Text edit background = editCaretBmp
- Enabled = True
- MinutesRoll
- Focusable = Disable
- Value = 0
- Min = 0
- Max = 59
- Use Cyclic Roll = Enable
- Value Color = Balck
- Unit Text = Add one space
- Unit Color = Black
- Decoration Image = decorationOrangeBmp
- Text edit background = editCaretBmp
- Enabled = True
- In the AlarmEnable group, include the background image, AlarmClock text node, AlarmClock icon, and a Toggle button from the Toolbox.
- Group the AlarmEnable and TimeRoller in one group (AlarmClockControl)
- ToggleButton(AlarmButton)
- First Event Handler
- Add Check Control State to Condition
- State Condition = ChangedToFalse
- Add Set Image to actions
- Target node = BackgroundImageNode
- Image = Background_White
- Use as Default = Yes
- Include Set Control State in actions
- Target node = HoursRoll
- State = Enabled
- ChangeTo = Enabled
- Include another Set Control State
- Target node = MinutesRoll
- State = Enabled
- ChangeTo = Enabled
- Add Check Control State to Condition
- Second Event Handler
- Add Check Control State to Condition
- State Condition = ChangedToTrue
- Add Set Image to actions
- Target node = BackgroundImageNode
- Image = Background_Grey
- Use as Default = No
- Include Set Control State in actions
- Target node = HoursRoll
- State = Enabled
- ChangeTo = Disabled
- Include another Set Control State
- Target node = MinutesRoll
- State = Enabled
- ChangeTo = Disabled
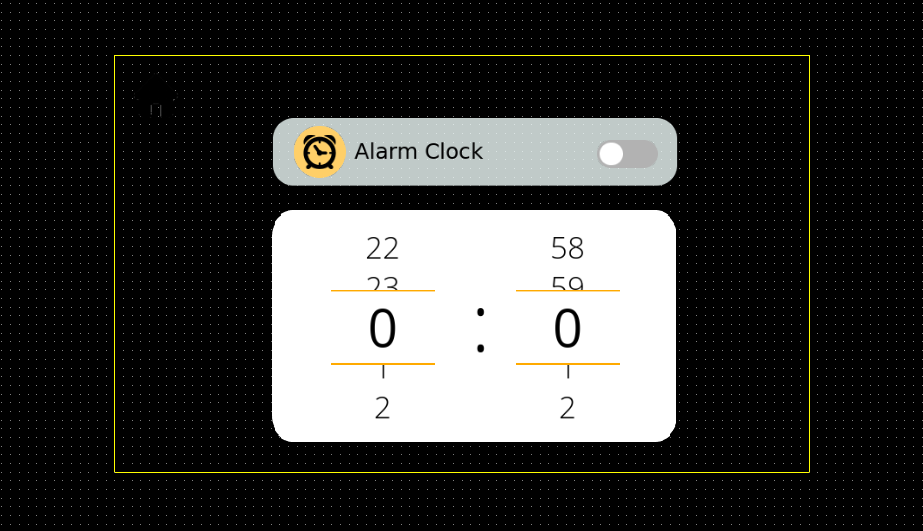
- You can follow this final outcome scene as a visual reference for AlarmControlClock
- Add Check Control State to Condition
- First Event Handler



Part 9: Alarm Shaking
Children Smart Home Part 9: Alarm Shaking
- Create a button named AlarmShakingBtn and place it inside a group AlarmShaking.
- RightClick on the button → Add Animated Property
- Create new animation
- Property = Rotation
- Interpolation = Spline
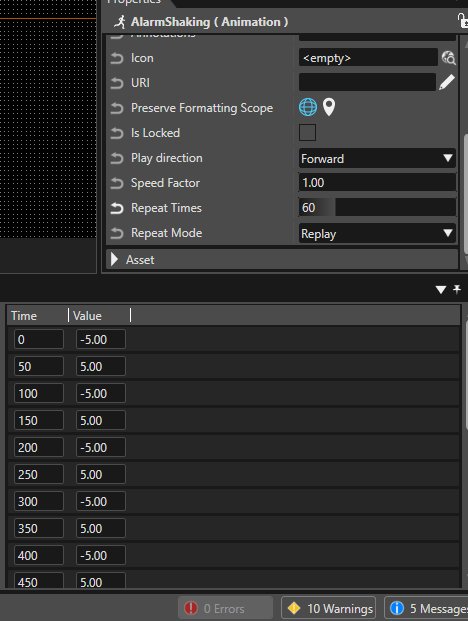
- Set the value to alternate between 5 and -5 every 50 ms until 1000 ms.
- Increase the Repeat Times to 60
- RightClick on the button → Add Animated Property
- AlarmShakingBtn
- In the Event Handler actions, Disable ConsumeEvent and use “Send Value as Event” with the
following settings:- Value = Bool (True)
- EventDispatchStrategy = DedicatedBehavior
- In the Event Handler actions, Disable ConsumeEvent and use “Send Value as Event” with the
- Add a value behavior in Dedicated behavior
- Variant = Bool (False)
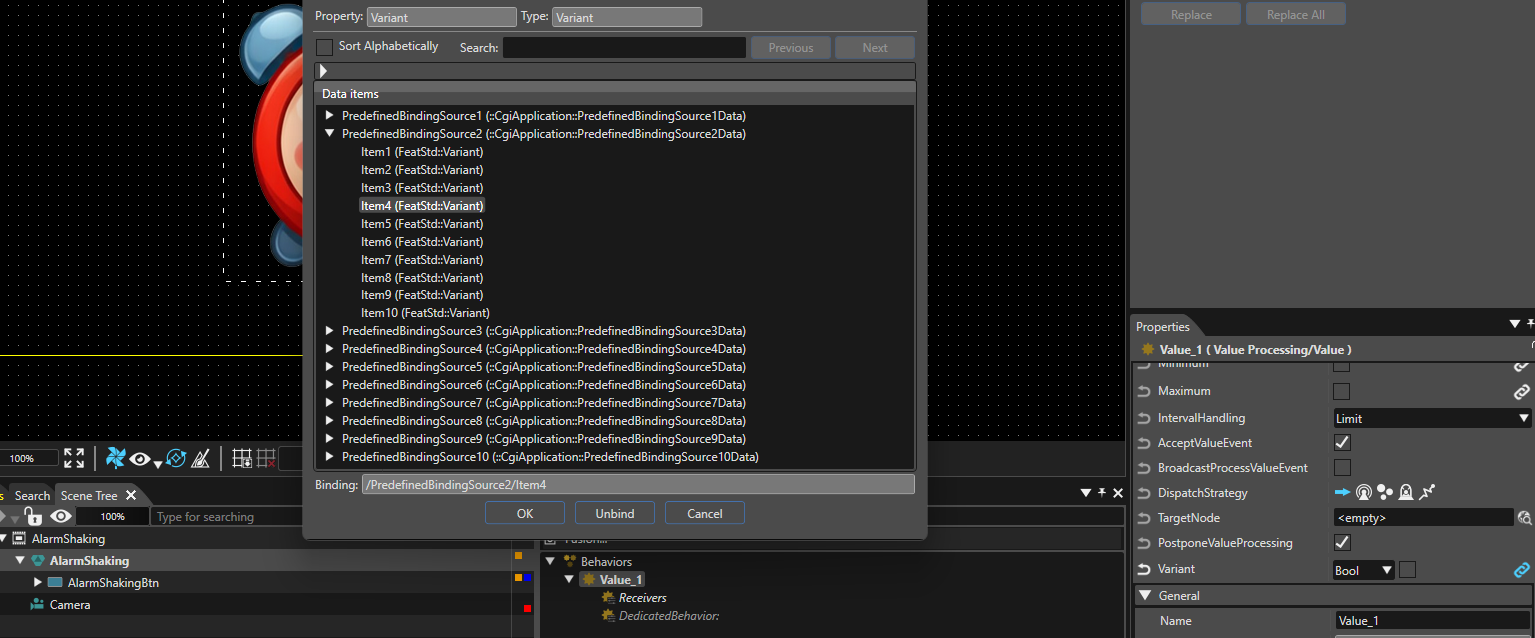
- Click on chain icon and bind the Variant to PredefinedBindingSource2 → Item5
- Place this button in a group named AlarmShaking.
- Let’s go back to BackgroundScene2D
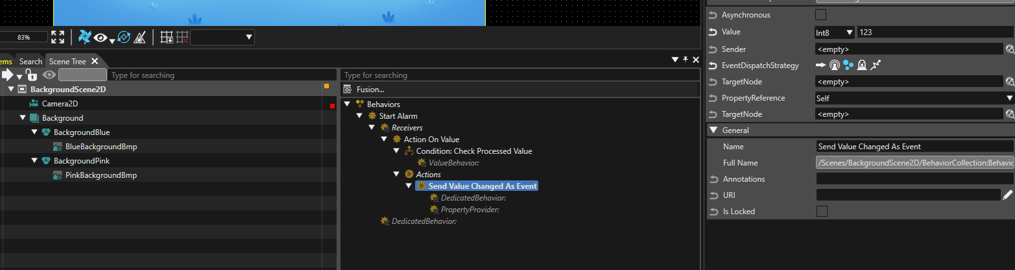
- Add a Value behavior and name it as Start Alarm
- Variant = False (Bool)
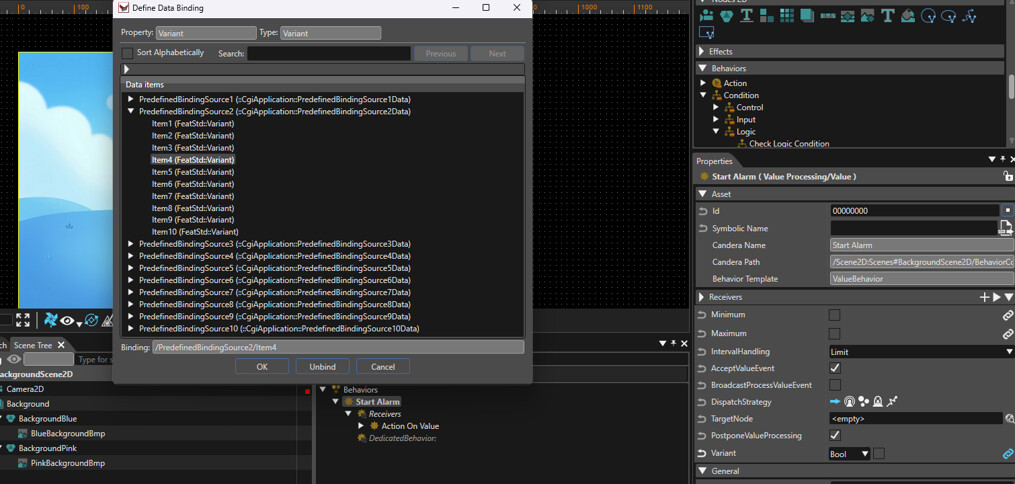
- Attach databinding PredefinedBindingSource2, Item4.
- ·Add Action On Value to the Receivers
- Condition : Check Processed Value
- ConditionOperator = Equal
- ConditionValue = True
- To the Actions add Send Value Changed As Event
- Value = 123 (Int8)
- EventDispatchStrategy = Bubble
- Condition : Check Processed Value
- Add a Value behavior and name it as Start Alarm
- In the AlarmShaking scene, add another action named Send Value As Event to AlarmShakingBtn.
- Value = False (Bool)
- EventDispatchStrategy = DedicatedBehavior
- Set the DedicatedBehavior path to the Start Alarm value behavior from BackgroundScene2D.
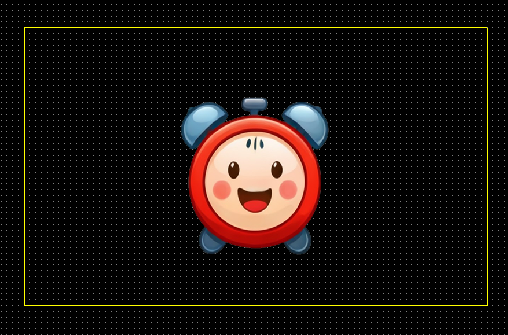
- This is the final output of AlarmShaking scene.

Part 10: State Machine
Children Smart Home Part 10: State Machine
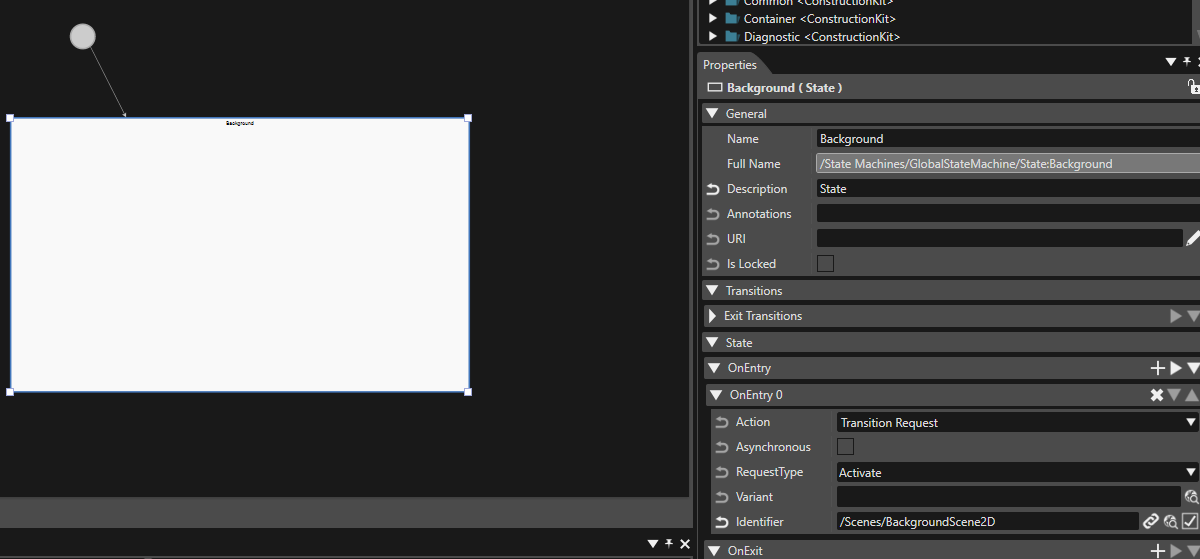
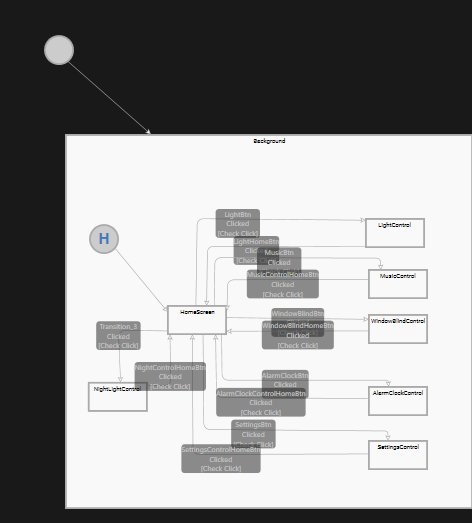
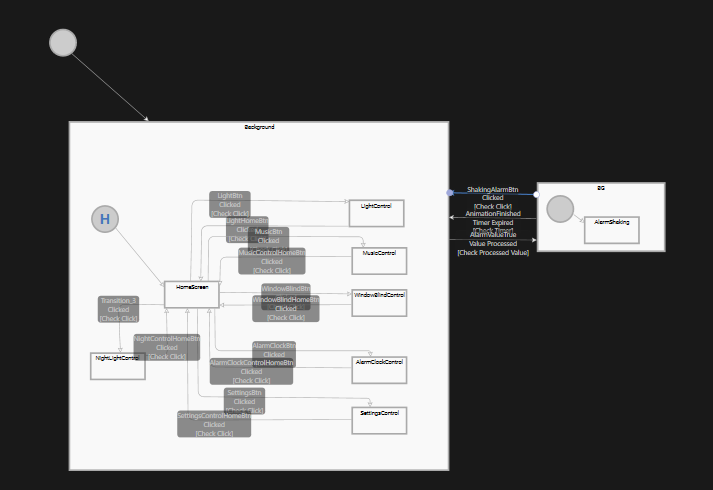
- Use the GlobalStateMachine and enable the “Is Global” option.
- Add a state named Background to maintain a common background across all scenes.
- OnEntry Action = Transition Request
- RequestType = Activate
- Identifier = BackgroundScene2D path.
- Add History state
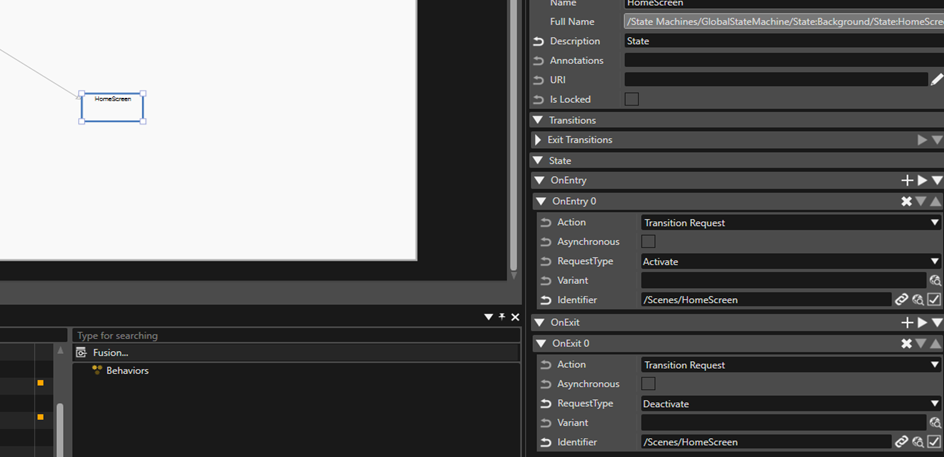
- Create a state named HomeScreen inside the Background state and connect the Initial state to HomeScreen using Transition.
- HomeScreen state On Entry Action = Transition Request
- RequestType = Activate
- Identifier = HomeScreen scene path
- HomeScreen state On Exit Action = Transition Request
- RequestType = Deactivate
- Identifier = HomeScreen scene path
- Add another state named LightControl inside the Background state.
- LightControl state On Entry Action = Transition Request
- RequestType = Activate
- Identifier = LightControl scene path
- LightControl state On Exit Action = Transition Request
- RequestType = Deactivate
- Identifier = LightControl scene path
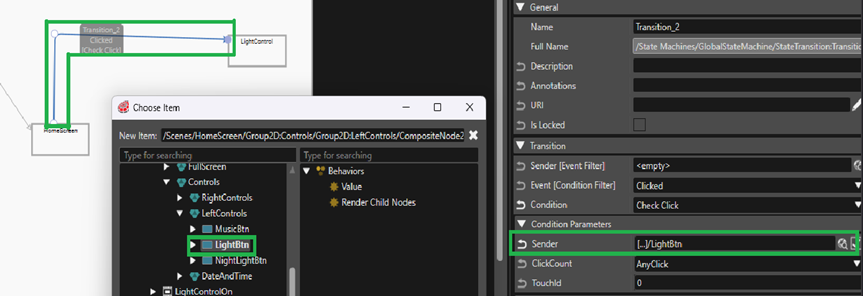
- Create a transition from HomeScreen to LightControlState.
- Set the LightBtn path from HomeScreen scene as the Sender.
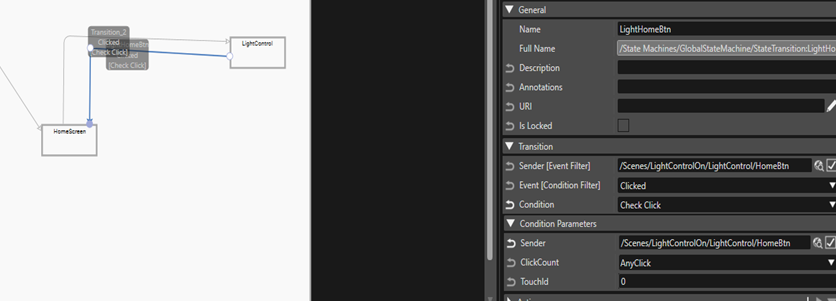
- Similarly, add another transition from LightControl state to HomeScreen
- Set the HomeBtn path from LightControl scene as the Sender
- Repeat the same steps for all other scene states (AlarmClock, MusicControl, NightLightControl, Settings, WindowBlindControl), excluding the AlarmShaking state.
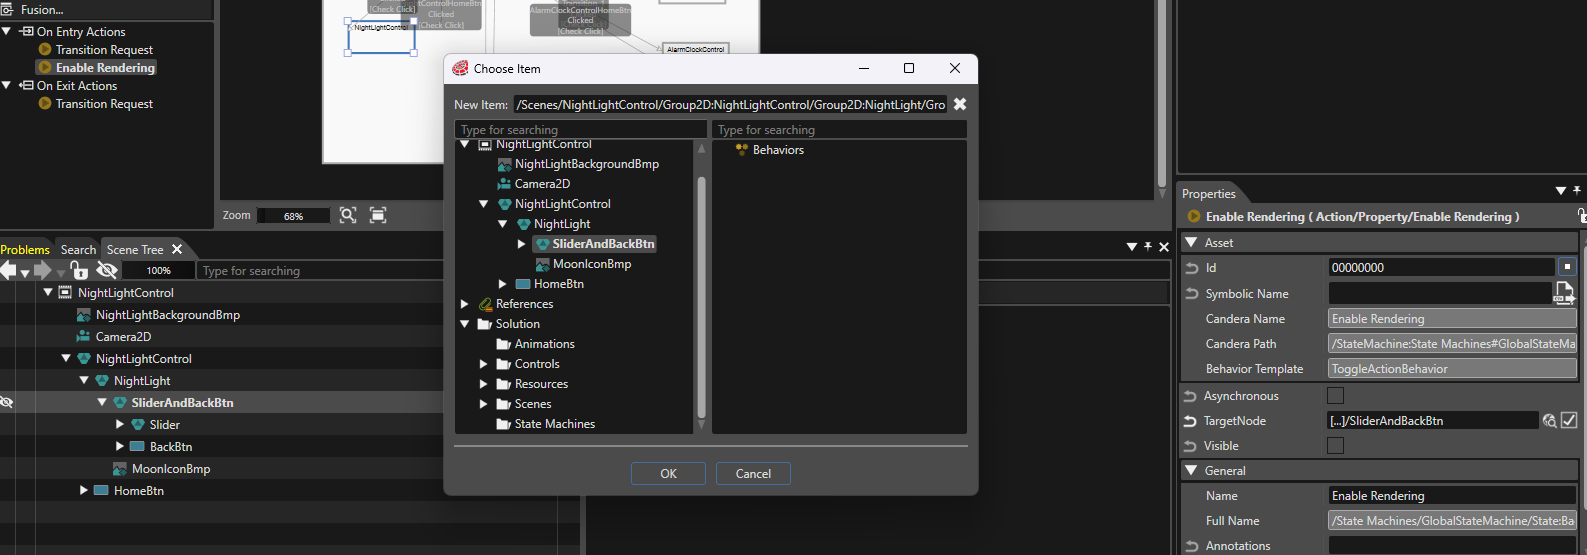
- Add Enable rendering to the “On Entry Actions” of NightLightControl State.
- TargetNode = SliderAndBackBtn
- Visible = Disable
- Add a separate background state for AlarmShaking, similar to the Background state used for all other states.
- Add an InitialState inside the background state and connect it to another state named AlarmShaking.
- AlarmShaking State
- OnEntry Action = Transition Request
- RequestType = Activate
- Identifier = AlarmShaking Scene Path
- OnEntry 1 Action = Start Timer
- Delay = 60000
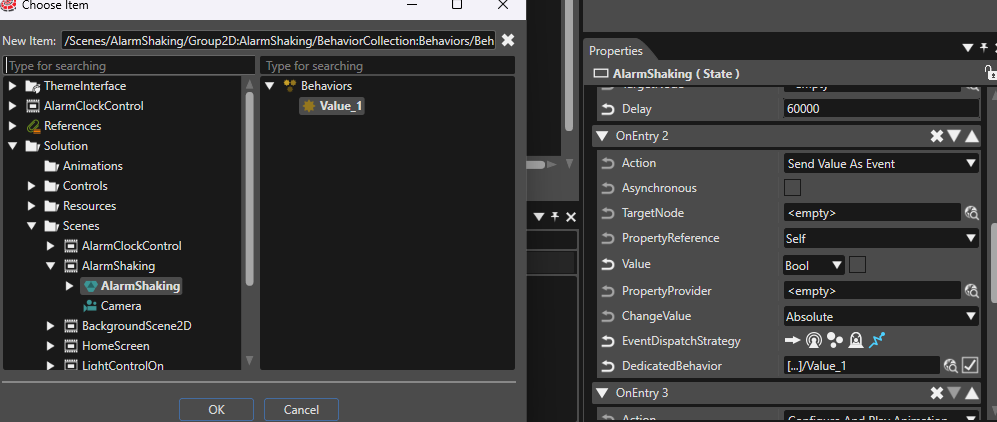
- OnEntry 2 Action = Send Value As Event
- Value = Bool (False)
- EventDispatchStartegy = DedicatedBehavior
- DedicatedBehavior = Path to the Value behavior (Start Alarm) from BackgroundScene2D
- OnEntry Action = Transition Request
- OnEntry 3 Action = Configure And Play Animation
- Animation = Path to the AlarmShaking Animation
- RepeatCount = 60
- OnExit Action = Transition Request
- RequestType = Deactivated
- Identifier = AlarmShaking Scene Path
- OnExit 1 Action = Configure And Play Animation
- Animation = Path to the AlarmShaking Animation
- Action = Stop
- Transition (AlarmValueTrue) from Background to BG state
- Condition = Check Changed Value
- ConditionOperator = Equal
- ConditionValue = 123 (Int8)
- Transition (AnimationFinished) from BG to Background State
- Condition = CheckTimer
- Event [Condition Filter] = Time Expired.
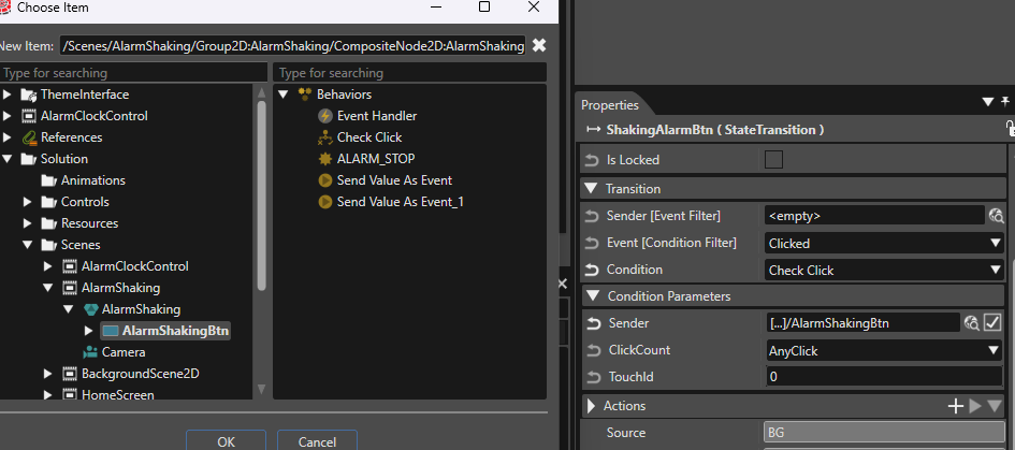
- Transition (ShakingAlarmBtn) from BG to Background state
- Condition = Check Click
- Sender = Path to AlarmShakingBtn from AlarmShaking scene
- Final State Machine